本节分为 7 大类:
类和对象、this 指针
构造函数和析构函数
深拷贝和浅拷贝
类和对象代码应用实践
构造函数的初始化列表
类的各种成员方法及区别
指向类成员的指针
1. 类和对象、this 指针 C 语言是面向过程 的,关注的是过程。分析出求解问题的步骤,通过函数调用逐步 解决问题。
C++ 是基于面向对象 的,关注的是对象,将一件事情拆分成不同的对象,靠对象之间的交互 完成。
1. 类的引入 C语言中,结构体中只能定义变量,在C++中,结构体内不仅可以定义变量,也可以定义函数。
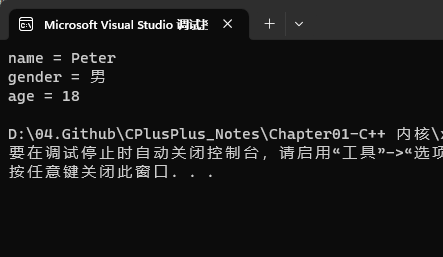
1 2 3 4 5 6 7 8 9 10 11 12 13 14 15 16 17 18 19 20 21 22 23 24 25 26 27 28 29 30 31 #include <iostream> using namespace std;struct Student void SetStudentInfo (const char * name, const char * gender, int age) {strcpy (_name, name);strcpy (_gender, gender);void PrintStudentInfo () {"name = " << _name << endl;"gender = " << _gender << endl;"age = " << _age << endl;char _name[20 ];char _gender[3 ];int _age;int main () SetStudentInfo ("Peter" , "男" , 18 );PrintStudentInfo ();return 0 ;
上面结构体的定义,在 C++ 中更喜欢用class来代替。
2. 类的定义 语法结构:
class为定义类的关键字ClassName为类的名字{}中为类的主体注意类定义结束时后面分号。
类中的元素称为类的成员 ,类中的数据称为类的属性 或者成员变量 。 类中的函数称为类的方法 或者成员函数 。
类的两种定义方式:
声明和定义全部放在类体中,需要注意:成员函数如果在类中定义,编译器可能会将其当成内联函数处理。
声明放在.h文件中,类的定义放在cpp文件中。推荐使用!
3. 类的访问限定符及封装
访问限定符:
C++实现封装的方式:用类将对象的属性与方法结合在一块,让对象更加完善,通过访问权限选择性的将其接口提供给外部的用户使用。
访问限定符说明:
public 修饰的成员在类外可以直接被访问protected 和 private 修饰的成员在类外不能直接被访问(此处 protected 和 private 是类似的)访问权限作用域从该访问限定符出现的位置开始直到下一个访问限定符出现时为止
class 的默认访问权限为 private,struct 为 public (因为 struct 兼容 C) 注意:访问限定符只在编译时有用,当数据映射到内存后,没有任何访问限定符上的区别
问:C++ 中 struct 和 class 的区别是什么?
答:C++ 需要兼容 C 语言,所以 C++ 中 struct 可以当成结构体去使用。另外 C++ 中 struct 还可以用来定义类。 和 class 是定义类是一样的,区别是 struct 的成员默认访问方式是 public,class 的成员默认访问方式是 private。
封装
面向对象的三大特性:封装 、继承 、多态 。
在类和对象阶段,我们只研究类的封装特性,接下来讨论封装。
封装:将数据和操作数据的方法进行有机结合,隐藏对象的属性和实现细节,仅对外公开接口来和对象进行交互。
封装本质上是一种管理:
使用类数据和方法都封装到一下。 不想给别人看到的,使用 protected / private 把成员封装起来。开放一些共有的成员函数对成员合理的访问。所以封装本质是一种管理。
4. 类的作用域 类定义了一个新的作用域,类的所有成员都在类的作用域中。在类体外定义成员,需要使用::作用域解析符指明成员属于哪个类域。
1 2 3 4 5 6 7 8 9 10 11 12 13 class Person {public :void PrintPersonInfo () private :char _name[20 ];char _gender[3 ];int _age;void Person::PrintPersonInfo () " " <<_gender<<" " <<_age<<endl;
5. 类的实例化 用类类型创建对象的过程 ,称为类的实例化。
类只是一个模型一样的东西,限定了类有哪些成员,定义出一个类并没有分配实际的内存空间来存储它。
一个类可以实例化出多个对象,实例化出的对象 占用实际的物理空间,存储类成员变量。
做个比方。类实例化出对象就像现实中使用建筑设计图建造出房子,类就像是设计图,只设计出需要什么东西,但是并没有实体的建筑存在,同样类也只是一个设计,实例化出的对象才能实际存储数据,占用物理空间
6. 类对象模型 如何计算类对象的大小
1 2 3 4 5 6 7 8 9 10 11 12 13 14 15 16 17 18 19 20 21 #include <iostream> using namespace std;class A public :void PrintA () {private :char _a;int main () sizeof (A) << endl;return 0 ;
类中既可以有成员变量,又可以有成员函数,那么一个类的对象中包含了什么?如何计算一个类的大 小? 类中既有成员,又有成员函数。
1 2 3 4 5 6 7 8 9 10 11 12 13 14 15 class A1 {public :void f1 () private :int _a;class A2 {public :void f2 () class A3 {};
解:
1 2 3 sizeof (A1) :4 sizeof (A2) :1 sizeof (A3) :1
结论:
一个类的大小,实际就是该类中”成员变量”之和,当然也要进行内存对齐,注意空类的大小,空类比较特殊,编译器给了空类 一个字节 来唯一标识这个类。
7. this 指针 1 2 3 4 5 6 7 8 9 10 11 12 13 14 15 16 17 18 19 20 21 22 23 24 25 26 27 28 29 30 31 #include <iostream> using namespace std;class Date {public :void Display () "-" << _month << "-" << _day << endl;void SetDate (int year, int month, int day) private :int _year; int _month; int _day; int main () SetDate (2018 , 5 , 1 );SetDate (2018 , 7 , 1 );Display ();Display ();return 0 ;
对于上述类,有这样的一个问题: Date 类中有 SetDate 与 Display 两个成员函数,函数体中没有关于不同对象的区分,那当 s1 调用 SetDate 函数时,该函数是如何知道应该设置 s1 对象,而不是设置 s2 对象呢?
C++ 中通过引入 this 指针解决该问题,即:C++ 编译器给每个“成员函数“增加了一个隐藏的指针参数,让该指针指向当前对象(函数运行时调用该函数的对象),在函数体中所有成员变量的操作,都是通过该指针去访问。只不过所有的操作对用户是透明的,即用户不需要来传递,编译器自动完成。
8. this 指针特性
this指针的类型:类类型* const。只能在“成员函数”的内部使用。
this指针本质上其实是一个成员函数的形参,是对象调用成员函数时,将对象地址作为实参传递给this形参。所以对象中不存储this指针。this指针是成员函数第一个隐含的指针形参,一般情况由编译器通过ecx寄存器自动传递,不需要用户传递。
2. 构造函数和析构函数 1. 构造函数
因只有对象创建时,才会分配空间,类中非静态数据成员不能够在类内直接初始化或赋值,C++ 提供了构造函数对类的数据成员进行初始化,或者是赋值。
C++ 中类的默认构造函数是一个空函数,什么也不做,如果用户在类中声明了构造函数,默认构造函数就不再起作用了。
构造函数没有返回值,名字与类名相同。
注意事项:
类的构造函数支持函数重载。
类的构造函数一般作为类的公有(public)成员函数,在创建对象时可成功调用构造函数,若作为私有(private)或(protected)成员函数,在类外创建对象时是无法访问的。
类的构造函数有形参时可指定默认值,用法跟普通函数设置默认值一样,形参可全部指定默认值,也可部分默认值,部分有默认值也是从右向左连续指定,随意给形参指定默认值会报错,这与普通的函数给形参指定默认值用法一致。
使用没有形参的构造函数时,定义对象时不需要加括号,使用有形参的构造函数,如果形参全部有默认值,也可以不传参数,也是不用加括号。
构造函数除了对数据成员进行赋值外,还可以利用初始化列表对数据成员进行初始化,参数列表只需要在定义的时候写上就行了,初始化和赋值的区别在于,初始化是数据成员在定义的时候完成的( 像 int a = 10; 这是初始化 ),赋值是数据成员定义之后进行的( 像 int b; b = 12; 这是赋值 ),在重载的情况中,执行哪个构造函数就执行哪个初始化列表。
1 2 3 4 5 6 7 8 9 10 11 12 13 14 15 16 17 18 19 20 21 22 23 24 class Test {public :Test (int nn, double dd, char cc) d (dd), n (nn), c (cc) 10 ;3.4 ;'b' ;void show () const " " << d << " " << c << endl;private :int n;double d;char c;Test test (2 , 2.1 , 'a' ) ;show ();
初始化列表顺序对数据初始化的顺序是没有影响的,数据初始化的顺序与类中声明的顺序一致
类中数据成员有引用或者是 const 类型必须进行初始化,这两种类型不支持赋值操作
1 2 3 4 5 6 7 8 9 10 11 12 13 14 15 16 17 18 19 class Test {public :Test (int & nn, const double dd) d (dd), n (nn)void show () const " " << d << endl;private :int & n;const double d;int n = 5 ;Test test (n, 3.5 ) ;show ();
2. 析构函数
形式是构造函数名字前面加一个 “~”
析构函数只有一个没有重载
析构函数也没有形参
析构函数是在对象生命周期结束时自动调用的,它负责清理工作
与构造函数相同,类中都包含一个默认的析构函数,若类中声明了析构函数,默认的析构函数就失去了作用
3. 深拷贝和浅拷贝 在了解拷贝前,我们需要先知道 拷贝构造函数 的本质
拷贝构造本质上也是构造函数
参数是所在类的常引用的构造函数
类中默认的拷贝构造函数,实现的是逐个复制非静态成员(成员的复制称为浅复制)值,复制的是成员的值,这种类中默认的拷贝构造函数实现的过程被称为浅拷贝
1 2 3 4 5 6 7 8 9 10 11 12 13 14 15 16 17 18 19 20 21 22 23 24 25 26 class Test {public :Test (int nn, double dd) n (nn), d (dd)Test (const Test& t) n (t.n), d (t.d)void show () const " " << d << endl;private :int n;double d;Test t (5 , 2.5 ) ; Test test1 (t) ; new Test (t); delete test3;
浅拷贝方式对于一般的数据成员是”OK”的,当遇到实例化对象时在构造函数中为其申请了堆区的空间,在析构函数中对申请的堆区空间进行释放,不调用拷贝构造函数也是”OK”的,但系统默认的拷贝构造函数进行的是浅拷贝,它会把指针的值也同样复制给另一个对象的同一个成员,这样两个对象同时指向的是一块堆区空间,在对象生命周期结束时,它们都会调用各自的析构函数释放同一块空间,这就导致了空间的重复释放,这是浅拷贝存在的问题
针对浅拷贝存在的问题,出现了深拷贝来解决这个问题,在深拷贝构造函数中,它不是再进行简单的给指针变量复制地址,而是给指针变量同样申请一块空间,这样在对象生命周期结束的时候调用析构函数就不会出现重复释放空间的问题了,这就是深拷贝的主要作用
1 2 3 4 5 6 7 8 9 10 11 12 13 14 15 16 17 18 19 20 21 22 23 24 25 26 27 28 29 30 31 32 33 34 35 36 37 38 39 40 41 42 43 44 45 class Test {public :Test (int n) p (new int (n))Test (const Test& t) p (t.p)Test () {delete p;private :int * p;Test t (10 ) ;Test test (t) ;class Test {public :Test (int n)p (new int (n))Test (const Test& t) p (new int (*t.p))Test () {delete p;private :int * p;Test t (10 ) ;Test test (t) ;
1. 浅拷贝和深拷贝原理 拷贝就是 复制 ,创建副本。假设有对象A,A有属性t1、t2。那么,通过拷贝 A 得到 B,那么 B 应该有属性 t1、t2,且A、B两个对象的每个属性,都应该是相同的。
对于基本类型的属性 t1,拷贝是没有疑义的。简单将值复制一份,就达到了拷贝的效果。而对于引用类型的属性 t2 来说,拷贝就有了两层含义:
第一层是,只是将 t2 引用的地址复制一份给 B 的 t2,确实达到了属性相同的效果,可以理解为实现了拷贝,但是事实上,两个对象中的属性 t2 对应的是同一个对象。在 B 对象上对 t2 所指向的对象进行操作,就会影响到 A 对象中的 t2 的值。
第二层是,将 A 的 t2 所指向的对象,假设为 o1,完整复制一份,假设为 o2,将新的 o2 的地址给 B 的 t2。也达到了复制的效果,且对 B 的 t2 所指向的 o2 进行操作,不会影响到 A 的 t2 所指向的 o1。
拷贝的两层含义,对应了浅拷贝和深拷贝的概念,做了第一层,就是浅拷贝,做到第二层,就是深拷贝。
总结 :
简而言之:深拷贝和浅拷贝可以简单理解为:如果一个类拥有资源,当这个类的对象发生复制过程的时候,资源重新分配,这个过程就是深拷贝,反之,没有重新分配资源,就是浅拷贝。
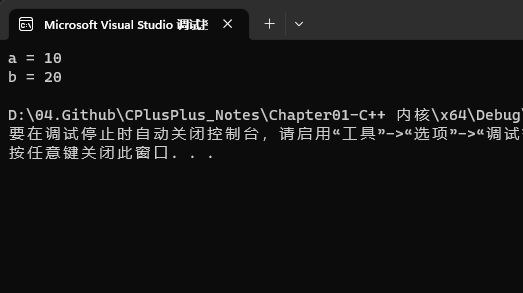
2. 浅拷贝和深拷贝实现 1 2 3 4 5 6 7 8 9 10 11 12 13 14 15 16 17 18 19 20 21 22 23 24 25 26 27 28 29 30 31 32 33 34 35 #include <iostream> using namespace std;class Light public :Light () : a (0 ), b (0 ) {};Light (int A, int B) : a (A), b (B) {};void show () {"a = " << this ->a << endl;"b = " << this ->b << endl;private :int a;int b;int main () int a = 10 ;int b = 20 ;Light obj1 (a, b) ;show ();return 0 ;
实现 String 类来了解 深拷贝:
1 2 3 4 5 6 7 8 9 10 11 12 13 14 15 16 17 18 19 20 21 22 23 24 25 26 27 28 29 30 31 32 33 34 35 36 37 38 39 40 41 42 43 44 45 46 47 48 49 50 51 52 53 54 55 56 57 58 59 60 61 62 63 64 65 66 67 68 69 70 71 72 73 74 75 76 77 #include <iostream> #include <new> using namespace std;class String public :String (const char * str = nullptr )" 默认构造函数:" << endl;if (str)new char [strlen (str) + 1 ];strcpy (data_, str);else new char [1 ];0 ;String (const String& str)"拷贝构造:" << endl;new char [strlen (str.data_) + 1 ];strcpy (data_, str.data_);operator =(const String& str)"赋值重载:" << endl;if (this == &str)return *this ;delete [] data_;new char [strlen (str.data_) + 1 ];strcpy (data_, str.data_);return *this ;String () {delete [] data_;nullptr ;protected :private :char * data_ = nullptr ;int main () String s2 ("123" ) ;"hello" ;String s5 (s4) ;return 0 ;
4. 类和对象代码应用实践 实现:循环队列
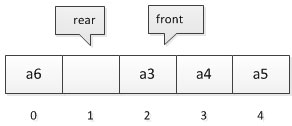
当队列空时,条件就是 front = rear,当队列满时,我们修改其条件,保留一个元素空间。也就是说,队列满时,数组中还有一个空闲单元。 如下图所示,我们就认为此队列已经满了
由于 rear 可能比 front 大,也可能比 front 小,所以尽管它们只相差一个位置时就是满的情况,但也可能是相差整整一圈。所以若队列的最大尺寸QueueSize,那么队列满的条件是 (rear+1) % QueueSize == front (取模“%的目的就是为了整合 rear 与 front 大小为一个问题)。
比如:QueueSize = 5,当 front=0,而 rear=4, (4+1) %5 = 0,所以此时队列满。再比如,front = 2而rear =1。(1 + 1) %5 = 2,所以此时 队列也是满的。而对于下图, front = 2而rear= 0, (0+1) %5 = 1,1!=2,所以此时队列并没有满。
另外,当 rear > front 时,此时队列的长度为 rear — front。但当rear < front时,队列长度分为两段,一段是 QueueSize-front,另一段是0 + rear,加在一起,队列长度为 rear-front + QueueSize
因此通用的计算队列长度公式为:
1 (rear — front + QueueSize) % QueueSize
总结:
队空条件:front == rear
队满条件:(rear+1) %QueueSize == front
队列长度:(rear—front + QueueSize) % QueueSize
实现:
1 2 3 4 5 6 7 8 9 10 11 12 13 14 15 16 17 18 19 20 21 22 23 24 25 26 27 28 29 30 31 32 33 34 35 36 37 38 39 40 41 42 43 44 45 46 47 48 49 50 51 52 53 54 55 56 57 58 59 60 61 62 63 64 65 66 67 68 69 70 71 72 73 74 75 76 77 78 79 80 81 82 83 84 85 86 87 88 89 90 91 92 93 94 95 96 97 98 99 100 101 102 103 104 105 106 107 108 109 110 111 112 113 114 115 116 117 118 119 120 121 122 123 124 125 126 127 128 129 130 131 132 133 134 135 136 137 138 139 140 141 142 143 144 145 146 147 148 149 150 151 152 153 154 155 156 157 158 159 160 161 162 163 164 165 166 167 168 169 #include <iostream> using namespace std;class Queue public :Queue (int size = 20 ) {new int [size];0 ;0 ;Queue (const Queue* queue) {new int [size_];int i = 0 ;for (i = front_; i != rear_; i = (i + 1 ) % size_)operator =(const Queue& q) {"operator=" << endl;if (this == &q)return *this ;delete queue_;new int [size_];int i = 0 ;for (i = front_; i != rear_; i = (i + 1 ) % size_)return *this ;Queue () {delete [] queue_;nullptr ;void push (int val) if (full ())resize ();1 ) % size_;void pop () if (empty ())return ;1 ) % size_;int top () return queue_[front_];bool empty () return rear_ == front_;private :void resize () {int * tmp = new int [size_ * 2 ];int index = 0 ;int i = 0 ;for (i = front_; i != rear_; i = (i + 1 ) % size_)delete queue_;0 ;2 ;bool full () {return (rear_ + 1 ) % size_ == front_;private :int * queue_;int front_;int rear_;int size_;int main () int i = 0 ;for (i = 0 ; i < 20 ; i++) {push (i);for (i = 20 ; i < 40 ; i++)push (i);while (!q1.empty ())top () << " " ;pop ();return 0 ;
5. 构造函数的初始化列表 构造函数初始化列表的情况有三种:
需要初始化的类的成员变量是对象的情况;
需要初始化的类的成员变量由 const 修饰的或初始化的类的引用成员变量;
子类初始化父类的成员;
情况1:类的成员变量是对象,并且这个对象只有含参数的构造函数,没有无参数的构造函数
如果有一个类的成员变量,它本身是一个类的对象,而且这个成员变量需要带参数的构造函数进行初始化,这时要对这个类的成员变量进行初始化,就必须调用这个类的成员变量的带参数的构造函数,如果没有初始化列表,那么将无法完成这一步,出现报错。
1 2 3 4 5 6 7 8 9 10 11 12 13 14 15 16 17 18 19 20 21 22 23 24 25 26 27 28 29 30 31 32 33 #include <iostream> using namespace std;class Test public :Test (int , int , int ) {"Test" << endl;private :int x;int y;int z;class MyTest public :MyTest () : test (1 , 2 , 3 ) { "MyTest" << endl;private :int main () return 0 ;
因为 Test 有了显示的带参数的构造函数,那么它是无法依靠编译器生成无参构造函数的,所以没有三个 int 型数据,就无法创建 Test 的对象。Test 类对象是 MyTest 的成员,想要初始化这个对象 test,那就只能用成员初始化列表,没有其它办法将参数传递给 Test 类构造函数。
情况2:需要初始化的类的成员变量由 const 修饰的或初始化的类的引用成员变量
1 2 3 4 5 6 7 8 9 10 11 12 13 14 15 16 17 class Test public :Test () :a (10 ) {} private :const int a; class Test public :Test (int _a) :a (_a) {} private :int & a;
**情况3:子类初始化父类的成员变量,需要在(并且也只能在)参数初始化列表中显示调用父类的构造函数
1 2 3 4 5 6 7 8 9 10 11 12 13 14 15 16 17 18 19 20 21 22 23 24 25 26 27 28 29 #include <iostream> using namespace std;class Test public :Test (){};Test (int x){ int_x = x;};void show () private :int int_x;class Mytest :public Testpublic :Mytest () :Test (110 ) int main () new Mytest ();show ();return 0 ;
执行顺序:
在对象构建过程中,如果有构造函数初始化列表,首先执行初始化列表中的内容,然后执行构造函数。并且,初始化列表中数据的构造顺序并不是按照在初始化列表中的先后顺序进行的,而是根据初始化列表中数据所在当前类中的定义顺序决定的。
6. 类的各种成员方法及区别 C++ 中,成员函数可以分为普通成员函数、静态成员函数和const成员函数。
1 2 3 4 5 6 7 8 9 10 11 12 13 14 15 16 17 18 19 20 21 22 23 24 25 26 27 28 29 30 31 32 33 34 35 36 37 38 39 40 41 42 43 44 45 46 47 48 49 50 51 52 53 54 class Date public :Date (int year, int month, int day)year_ (year)month_ (month)day_ (day)void show () const {"year:" << year_ << " month:" << month_ << " day:" << day_ << " " ;private :int year_;int month_;int day_;class Goods public :Goods (int id, string name, int price, int year, int month, int day)date_ (year, month, day)id_ (id)name_ (name)price_ (price)void show () const {show ();"id:" << id_ << " name:" << name_ << " price:" << price_ << endl;static int getCount () {return count_;private :int id_;int price_;static int count_; int Goods::count_ = 0 ;
1. 静态成员变量 静态成员变量在类内声明,在类外定义初始化
2.静态成员函数 静态成员函数不能使用普通成员变量,能使用静态成员变量
3. const 成员函数 一般将不修改成员变量的成员函数用 const 修饰,因为 const 对象只能调用 const 成员函数。
7. 指向类成员的指针 成员指针是 C++ 引入的一种新机制,它的申明方式和使用方式都与一般的指针有所不同。成员指针分为成员函数指针和数据成员指针。
1. 成员函数指针 在事件驱动和多线程应用中被广泛用于调用回调函数。在多线程应用中,每个线程都通过指向成员函数的指针来调用该函数。在这样的应用中,如果不用成员指针,编程是非常困难的。成员函数指针的定义格式:
1 成员函数返回类型 (类名::*指针名)(形参)= &类名::成员函数名
示例:
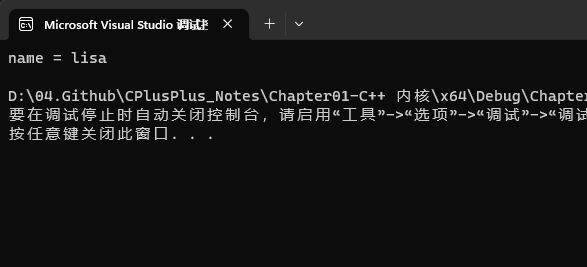
1 2 3 4 5 6 7 8 9 10 11 12 13 14 15 16 17 18 19 20 21 22 23 24 25 26 27 28 29 #include <iostream> #include <string> using namespace std;class A public :A (string s) {void print () "name = " << name << endl;private :int main () A a ("lisa" ) ;void (A::*memp)() = &A::print;return 0 ;
使用成员函数指着注意两点:
(1)使用成员函数指针时需要指明成员函数所属的类对象,因为通过指向成员函数的指针调用该函数时,需要将对象的地址用作this指针的值,以便进行函数调用;& 运算符,不能直接将 “类名 :: 成员函数名”赋给成员函数指针。
2. 数据成员指针 一个类对象生成后,它的某个成员变量的地址实际上由两个因素决定:
对象的首地址和该成员变量在对象之内的偏移量。
数据成员指针是用来保存类的某个数据成员在类对象内的偏移量的。它只能用于类的非静态成员变量。
数据成员指针的定义格式:
示例:
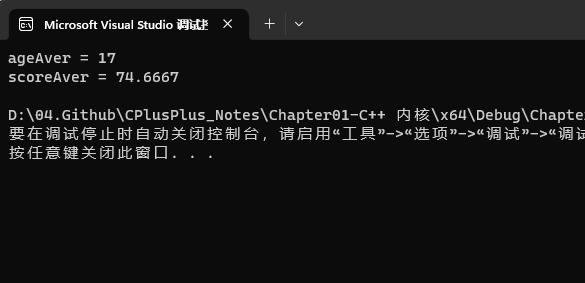
1 2 3 4 5 6 7 8 9 10 11 12 13 14 15 16 17 18 19 20 21 22 23 24 25 26 27 28 29 30 31 32 #include <iostream> using namespace std;class Student {public :int age;int score;double average (Student* objs, int Student::*pm, int count) int result = 0 ;int i = 0 ;for (i = 0 ; i < count; i++)return double (result) / count;int main () 3 ] = { {16 , 86 }, {17 , 80 }, {18 , 58 } };double ageAver = average (my, &Student::age, 3 );double scoreAver = average (my, &Student::score, 3 );"ageAver = " << ageAver << endl;"scoreAver = " << scoreAver << endl;return 0 ;
使用数据成员指针时,需要注意以下几点:
(1)数据成员指针作为一个变量,在底层实现上,存放的是对象的数据成员相对于对象首地址的偏移量,因此通过数据成员指针访问成员变量时需要提供对象的首地址,即通过对象来访问。从这个意义上说,数据成员指针并不是一个真正的指针。average() 函数的形参pm可以申明为int型变量,表示数据成员的偏移量,那么原来的obj.*pm 等同于 *(int*)((char*)(&obj)+pm),显然,这样书写可读性差,可移植性低且容易出错。
1 2 3 4 5 6 7 8 9 10 11 12 13 14 15 16 17 18 19 20 21 22 23 #include <iostream> using namespace std;class ArrayClass {int arr[5 ];public :ArrayClass () {for (int i=0 ;i<5 ;++i)void printArray (ArrayClass& arrObj,int (ArrayClass::* pm)[5 ]) for (int i=0 ;i<5 ;++i) {" " ;int main () printArray (arrObj,&ArrayClass::arr);
以上程序无法通过编译,因为成员 arr 在类 ArrayClass 中的访问权限设置为 private,无法访问。
要解决这个问题,将函数 printArray() 设置为类 ArrayClass 的友元函数是不行的,因为是在调用该函数时访问了类 ArrayClass 的私有成员,而不是在函数体内用到类 ArrayClass 的私有成员。因此,可以定义一个调用 printArray() 函数的友元函数。该函数的参数中并不需要传递类 ArrayClass 的私有成员。修改后的程序如下:
1 2 3 4 5 6 7 8 9 10 11 12 13 14 15 16 17 18 19 20 21 22 23 24 25 26 27 28 29 30 #include <iostream> using namespace std;class ArrayClass {int arr[5 ];public :ArrayClass () {for (int i=0 ;i<5 ;++i)friend void print (ArrayClass& arrObj) void printArray (ArrayClass& arrObj,int (ArrayClass::* pm)[5 ]) for (int i=0 ;i<5 ;++i)" " ;void print (ArrayClass& arrObj) printArray (arrObj,&ArrayClass::arr);int main () print (arrObj);
