- C++ 初识
- 数据类型
- 运算符
- 程序流程结构
- 数组
- 函数
- 指针
- 结构体
C++ 初识
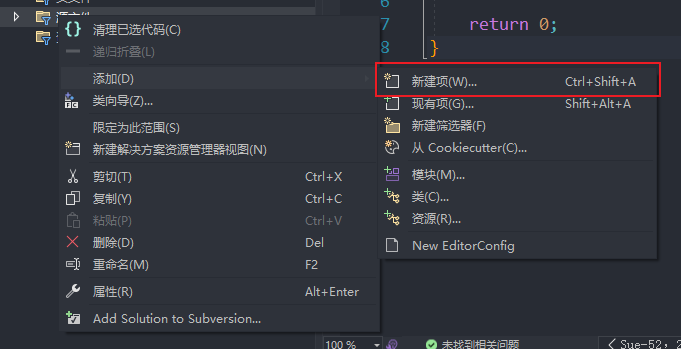
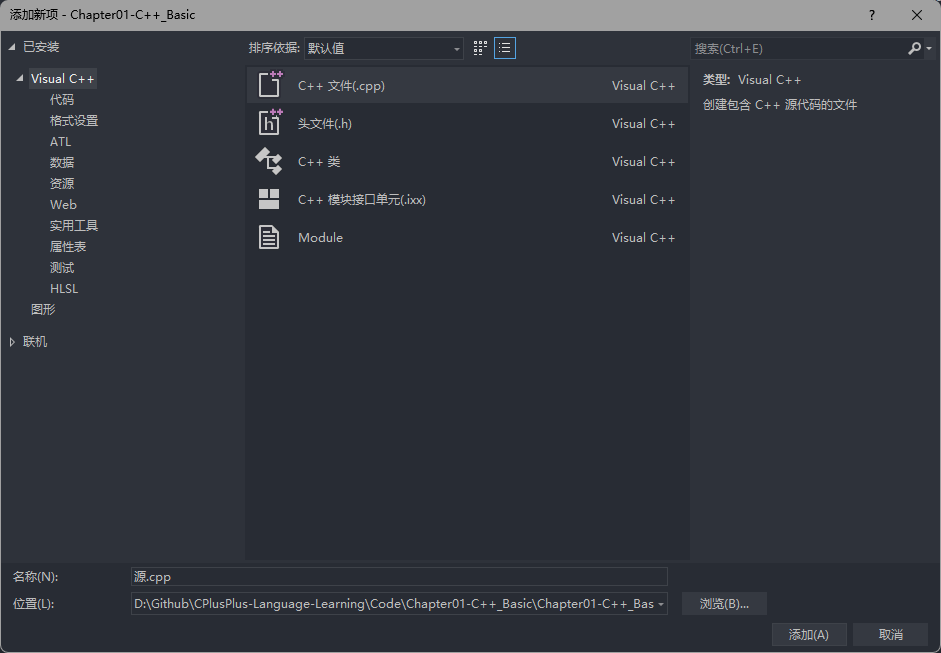
第一个 C++ 程序
C++ 程序的编写步骤:
创建项目

创建文件
编写代码
运行程序
1
2
3
4
5
6
7
8
9
10
| #define _CRT_SECURE_NO_WARNINGS 1
#include <iostream>
using namespace std;
int main()
{
cout << "Hello World!!" << endl;
return 0;
}
|
在整个程序中,必须只有一个 main 函数入口
注释
作用:在代码中加入一些说明和解释,方面或其他开发人员阅读和后期维护
两种格式:
单行注释:
通常放在一行代码的上方,或者语句的末尾;
对该行代码的说明或解释。
多行注释:
通常放在一行代码的上方
对该段代码整体做说明
编译器在编译代码时,会将注释进行忽略。
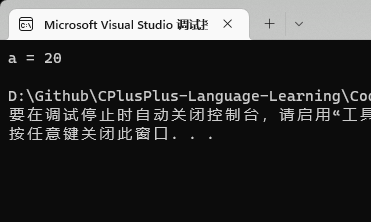
变量
作用:给一段指定的内存空间起名,方便操作这段内存中的数据。
语法:
Example:
1
2
3
4
5
6
7
8
9
10
11
12
| #define _CRT_SECURE_NO_WARNINGS 1
#include <iostream>
using namespace std;
int main()
{
int a = 20;
cout << "a = " << a << endl;
return 0;
}
|
常量
作用: 用于记录程序中一些不可更改数据
C++ 中定义常量有两种方法:
#define 宏常量:
通常在文件的顶部定义,表示一个常量;并且所有的字符以大写区分
const 修饰的变量
通常在变量定义前添加关键字 const ,将变量修饰为常量,不可修改。
Example:
1
2
3
4
5
6
7
8
9
10
11
12
13
14
15
16
| #define _CRT_SECURE_NO_WARNINGS 1
#include <iostream>
using namespace std;
#define NUM 10
int main()
{
cout << "宏常量:NUM = " << NUM << endl;
const int n = 100;
cout << "const n = " << n << endl;
return 0;
}
|
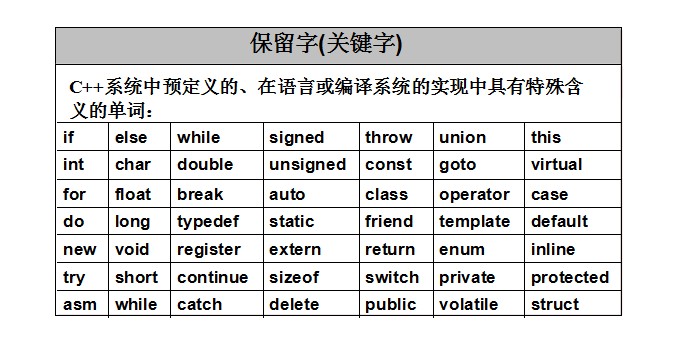
关键字
作用: 关键字是 C++ 中预先保留的单词(标识符)
在定义变量或者常量时,不需要使用关键字
标识符命名规则
作用: C++ 规定给标识符(变量、常量)命名时的规则:
- 标识符不能是关键字
- 标识符只能是字符、数字、下划线
- 第一个字符必须为字符或下划线
- 标识符中字符区分大小写
建议:
给标识符命名时,采用英文单词并描述该变量在整个程序的意义。
数据类型
C++ 中规定了在创建变量和常量时,必须指定出对应的数据类型,否则无法分配内存。
整形
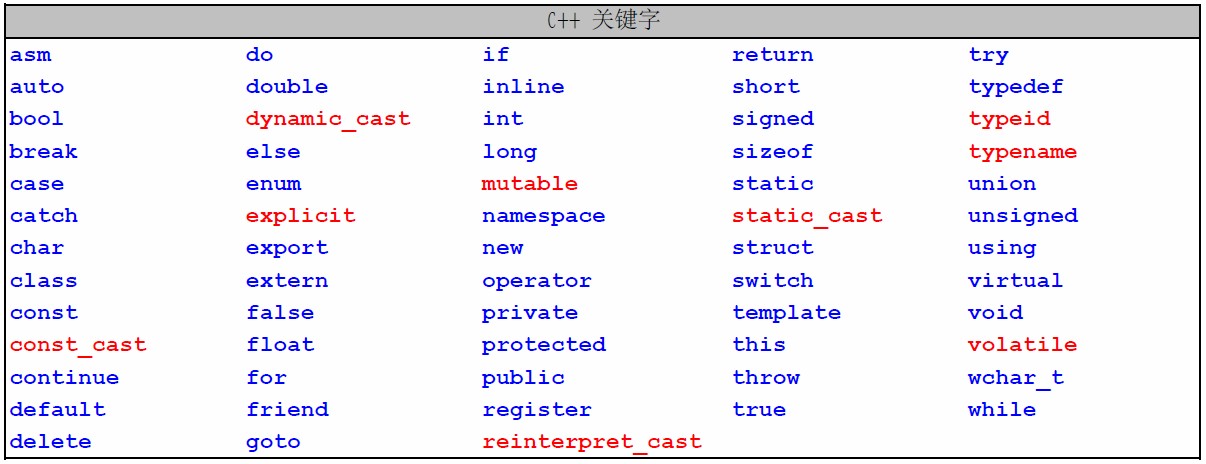
作用: 整形变量标识的是 整数类型 的数据
| 数据类型 |
占用空间 |
取值范围 |
| short 短整型 |
2 字节 |
-2^15 ~ 2^15-1 |
| int 整形 |
4 字节 |
-2^31 ~ 2^31-1 |
| long 长整型 |
windows 4 字节;linux(32位) 4 字节,Linux(64位) 8 字节 |
-2^31 ~ 2^31-1 |
| long long 长长整形 |
8 字节 |
-2^63 ~ 2^63-1 |
1
2
3
4
5
6
7
8
9
10
11
12
13
14
15
16
| #define _CRT_SECURE_NO_WARNINGS 1
#include <iostream>
int main()
{
int a = 10;
short b = 10.0;
long l = 10000000;
long long ll = 12312312312321;
return 0;
}
|
sizeof 关键字
作用:利用 sizeof 关键字可以 统计数据类型所占内存大小
语法: sizeof( 数据类型 / 变量)
示例:
1
2
3
4
5
6
7
8
9
10
11
12
13
14
15
16
17
| #define _CRT_SECURE_NO_WARNINGS 1
#include <iostream>
using namespace std;
int main()
{
cout << "short 类型所占内存空间为: " << sizeof(short) << endl;
cout << "int 类型所占内存空间为: " << sizeof(int) << endl;
cout << "long 类型所占内存空间为: " << sizeof(long) << endl;
cout << "long long 类型所占内存空间为: " << sizeof(long long) << endl;
return 0;
}
|
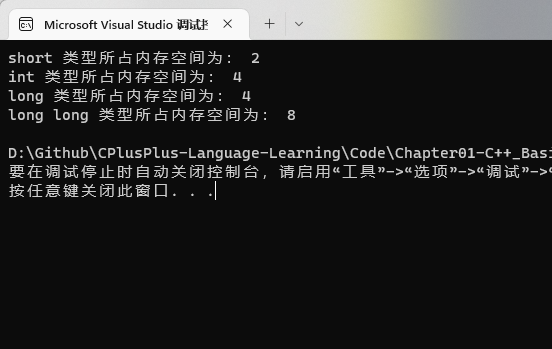
实型(浮点型)
作用:用于 表示小数
浮点型变量分为两种:
- 单精度float
- 双精度double
两者的区别在于表示的有效数字范围不同。
| 数据类型 |
占用空间 |
有效数字范围 |
| float |
4字节 |
7位有效数字 |
| double |
8字节 |
15~16位有效数字 |
1
2
3
4
5
6
7
8
9
10
11
12
13
14
15
16
17
18
19
20
21
22
23
24
25
| #define _CRT_SECURE_NO_WARNINGS 1
#include <iostream>
using namespace std;
int main()
{
float fl = 3.14f;
double dl = 3.14;
cout << fl << endl;
cout << dl << endl;
cout << "float sizeof = " << sizeof(fl) << endl;
cout << "double sizeof = " << sizeof(dl) << endl;
float f2 = 3e2;
cout << "f2 = " << f2 << endl;
float f3 = 3e-2;
cout << "f3 = " << f3 << endl;
return 0;
}
|
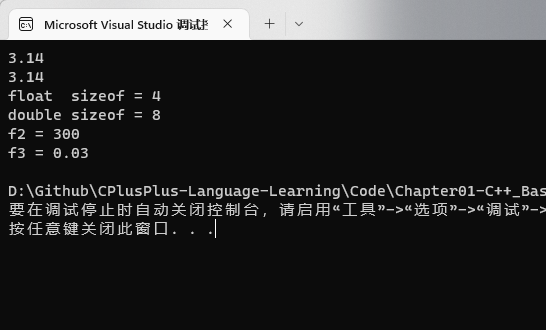
字符型
作用:字符型变量用于显示单个字符
语法:char ch = 'a';
注意1:在显示字符型变量时,用单引号将字符括起来,不要用双引号
注意2:单引号内只能有一个字符,不可以是字符串
- C 和 C++ 中字符型变量只占用
1个字节。
- 字符型变量并不是把字符本身放到内存中存储,而是将对应的 ASCII 编码放入到存储单元
示例:
1
2
3
4
5
6
7
8
9
10
11
12
13
14
15
16
17
18
19
20
| #define _CRT_SECURE_NO_WARNINGS 1
#include <iostream>
using namespace std;
int main()
{
char ch = 'a';
cout << ch << endl;
cout << "sizof(char) = " << sizeof(char) << endl;
cout << (int)ch << endl;
ch = 97;
cout << ch << endl;
return 0;
}
|
ASCII码表格:
| ASCII值 |
控制字符 |
ASCII值 |
字符 |
ASCII值 |
字符 |
ASCII值 |
字符 |
| 0 |
NUT |
32 |
(space) |
64 |
@ |
96 |
、 |
| 1 |
SOH |
33 |
! |
65 |
A |
97 |
a |
| 2 |
STX |
34 |
“ |
66 |
B |
98 |
b |
| 3 |
ETX |
35 |
# |
67 |
C |
99 |
c |
| 4 |
EOT |
36 |
$ |
68 |
D |
100 |
d |
| 5 |
ENQ |
37 |
% |
69 |
E |
101 |
e |
| 6 |
ACK |
38 |
& |
70 |
F |
102 |
f |
| 7 |
BEL |
39 |
, |
71 |
G |
103 |
g |
| 8 |
BS |
40 |
( |
72 |
H |
104 |
h |
| 9 |
HT |
41 |
) |
73 |
I |
105 |
i |
| 10 |
LF |
42 |
* |
74 |
J |
106 |
j |
| 11 |
VT |
43 |
+ |
75 |
K |
107 |
k |
| 12 |
FF |
44 |
, |
76 |
L |
108 |
l |
| 13 |
CR |
45 |
- |
77 |
M |
109 |
m |
| 14 |
SO |
46 |
. |
78 |
N |
110 |
n |
| 15 |
SI |
47 |
/ |
79 |
O |
111 |
o |
| 16 |
DLE |
48 |
0 |
80 |
P |
112 |
p |
| 17 |
DCI |
49 |
1 |
81 |
Q |
113 |
q |
| 18 |
DC2 |
50 |
2 |
82 |
R |
114 |
r |
| 19 |
DC3 |
51 |
3 |
83 |
S |
115 |
s |
| 20 |
DC4 |
52 |
4 |
84 |
T |
116 |
t |
| 21 |
NAK |
53 |
5 |
85 |
U |
117 |
u |
| 22 |
SYN |
54 |
6 |
86 |
V |
118 |
v |
| 23 |
TB |
55 |
7 |
87 |
W |
119 |
w |
| 24 |
CAN |
56 |
8 |
88 |
X |
120 |
x |
| 25 |
EM |
57 |
9 |
89 |
Y |
121 |
y |
| 26 |
SUB |
58 |
: |
90 |
Z |
122 |
z |
| 27 |
ESC |
59 |
; |
91 |
[ |
123 |
{ |
| 28 |
FS |
60 |
< |
92 |
/ |
124 |
| |
| 29 |
GS |
61 |
= |
93 |
] |
125 |
} |
| 30 |
RS |
62 |
> |
94 |
^ |
126 |
` |
| 31 |
US |
63 |
? |
95 |
_ |
127 |
DEL |
ASCII 码大致由以下两部分组成:
- ASCII 非打印控制字符: ASCII 表上的数字 0-31 分配给了控制字符,用于控制像打印机等一些外围设备。
- ASCII 打印字符:数字 32-126 分配给了能在键盘上找到的字符,当查看或打印文档时就会出现。
转义字符
作用:用于表示一些 不能显示出来的ASCII字符
现阶段我们常用的转义字符有: \n \\ \t
| 转义字符 |
含义 |
ASCII码值(十进制) |
| \a |
警报 |
007 |
| \b |
退格(BS) ,将当前位置移到前一列 |
008 |
| \f |
换页(FF),将当前位置移到下页开头 |
012 |
| \n |
换行(LF) ,将当前位置移到下一行开头 |
010 |
| \r |
回车(CR) ,将当前位置移到本行开头 |
013 |
| \t |
水平制表(HT) (跳到下一个TAB位置) |
009 |
| \v |
垂直制表(VT) |
011 |
| \\ |
代表一个反斜线字符”" |
092 |
| ' |
代表一个单引号(撇号)字符 |
039 |
| " |
代表一个双引号字符 |
034 |
| ? |
代表一个问号 |
063 |
| \0 |
数字0 |
000 |
| \ddd |
8进制转义字符,d范围0~7 |
3位8进制 |
| \xhh |
16进制转义字符,h范围09,af,A~F |
3位16进制 |
1
2
3
4
5
6
7
8
9
10
11
12
13
| #define _CRT_SECURE_NO_WARNINGS 1
#include <iostream>
using namespace std;
int main()
{
cout << "\\" << endl;
cout << "\tHello" << endl;
cout << "\n" << endl;
return 0;
}
|
字符串型
作用:用于表示一串字符
两种风格
C 风格字符串: `char 变量名[] = “字符串值”
1
2
3
4
5
6
7
8
9
10
11
| #define _CRT_SECURE_NO_WARNINGS 1
#include <iostream>
using namespace std;
int main()
{
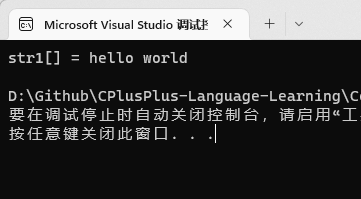
char str1[] = "hello world";
cout << "str1[] = " << str1 << endl;
return 0;
}
|
注意:C 风格的字符串要用双引号括起来
C++风格字符串: string 变量名 = "字符串值"
1
2
3
4
5
6
7
8
9
10
11
12
13
| #define _CRT_SECURE_NO_WARNINGS 1
#include <iostream>
#include <string>
using namespace std;
int main()
{
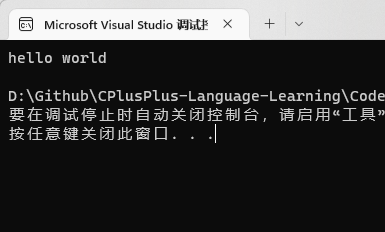
string str2 = "hello world";
cout << str2 << endl;
return 0;
}
|
布尔型 Boolean
作用:布尔数据类型代表真或假的值
bool类型只有两个值:
- true — 真(本质是1)
- false — 假(本质是0)
bool类型占1个字节大小
1
2
3
4
5
6
7
8
9
10
11
12
13
14
15
16
| #define _CRT_SECURE_NO_WARNINGS 1
#include <iostream>
using namespace std;
int main()
{
bool flag = true;
cout << flag << endl;
flag = false;
cout << flag << endl;
cout << "size of bool = " << sizeof(bool) << endl;
return 0;
}
|
数据的输入
作用:用于从键盘获取数据
关键字:cin
语法: cin >> 变量
1
2
3
4
5
6
7
8
9
10
11
12
13
14
15
16
17
18
19
20
21
22
23
24
25
26
27
28
29
30
31
32
33
34
35
36
37
38
| #define _CRT_SECURE_NO_WARNINGS 1
#include <iostream>
using namespace std;
int main(){
int a = 0;
cout << "请输入整型变量:" << endl;
cin >> a;
cout << a << endl;
double d = 0;
cout << "请输入浮点型变量:" << endl;
cin >> d;
cout << d << endl;
char ch = 0;
cout << "请输入字符型变量:" << endl;
cin >> ch;
cout << ch << endl;
string str;
cout << "请输入字符串型变量:" << endl;
cin >> str;
cout << str << endl;
bool flag = true;
cout << "请输入布尔型变量:" << endl;
cin >> flag;
cout << flag << endl;
system("pause");
return EXIT_SUCCESS;
}
|
运算符
作用:用于执行代码的运算
本章我们主要讲解以下几类运算符:
| 运算符类型 |
作用 |
| 算术运算符 |
用于处理四则运算 |
| 赋值运算符 |
用于将表达式的值赋给变量 |
| 比较运算符 |
用于表达式的比较,并返回一个真值或假值 |
| 逻辑运算符 |
用于根据表达式的值返回真值或假值 |
算术运算符
作用:用于处理四则运算
算术运算符包括以下符号:
| 运算符 |
术语 |
示例 |
结果 |
| + |
正号 |
+3 |
3 |
| - |
负号 |
-3 |
-3 |
| + |
加 |
10 + 5 |
15 |
| - |
减 |
10 - 5 |
5 |
| * |
乘 |
10 * 5 |
50 |
| / |
除 |
10 / 5 |
2 |
| % |
取模(取余) |
10 % 3 |
1 |
| ++ |
前置递增 |
a=2; b=++a; |
a=3; b=3; |
| ++ |
后置递增 |
a=2; b=a++; |
a=3; b=2; |
| – |
前置递减 |
a=2; b=–a; |
a=1; b=1; |
| – |
后置递减 |
a=2; b=a–; |
a=1; b=2; |
1
2
3
4
5
6
7
8
9
10
11
12
13
14
15
16
| #define _CRT_SECURE_NO_WARNINGS 1
#include <iostream>
using namespace std;
int main()
{
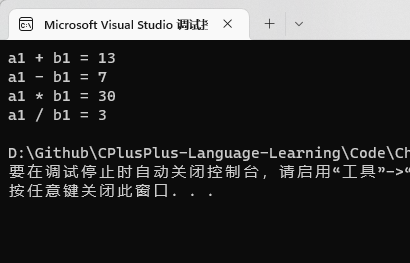
int a1 = 10;
int b1 = 3;
cout << "a1 + b1 = " << a1 + b1 << endl;
cout << "a1 - b1 = " << a1 - b1 << endl;
cout << "a1 * b1 = " << a1 * b1 << endl;
cout << "a1 / b1 = " << a1 / b1 << endl;
return 0;
}
|
1
2
3
4
5
6
7
8
9
10
11
12
13
14
15
16
17
18
19
20
21
22
| #define _CRT_SECURE_NO_WARNINGS 1
#include <iostream>
using namespace std;
int main()
{
int a2 = 10;
int b2 = 20;
cout << a2 / b2 << endl;
int a3 = 10;
int b3 = 0;
double d1 = 0.5;
double d2 = 0.25;
cout << d1 / d2 << endl;
return 0;
}
|
总结:在除法运算中,除数不能为0
取余 %
1
2
3
4
5
6
7
8
9
10
11
12
13
14
| #define _CRT_SECURE_NO_WARNINGS 1
#include <iostream>
using namespace std;
int main()
{
int a1 = 10;
int b1 = 4;
cout << "a1 \% b1 = " << a1 % b1 << endl;
return 0;
}
|
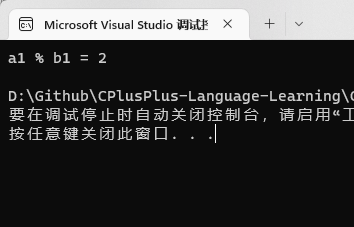
总结:只有整型变量可以进行取模运算
1
2
3
4
5
6
7
8
9
10
11
12
13
14
15
16
17
18
19
20
21
22
23
24
25
26
27
28
29
30
31
32
| #define _CRT_SECURE_NO_WARNINGS 1
#include <iostream>
using namespace std;
int main() {
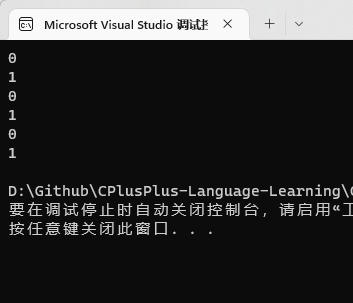
int a = 10;
a++;
cout << a << endl;
int b = 10;
++b;
cout << b << endl;
int a2 = 10;
int b2 = ++a2 * 10;
cout << b2 << endl;
int a3 = 10;
int b3 = a3++ * 10;
cout << b3 << endl;
system("pause");
return 0;
}
|
总结:前置递增先对变量进行++,再计算表达式,后置递增相反
赋值运算符
作用:用于将表达式的值赋给变量
赋值运算符包括以下几个符号:
| 运算符 |
术语 |
示例 |
结果 |
| = |
赋值 |
a=2; b=3; |
a=2; b=3; |
| += |
加等于 |
a=0; a+=2; |
a=2; |
| -= |
减等于 |
a=5; a-=3; |
a=2; |
| *= |
乘等于 |
a=2; a*=2; |
a=4; |
| /= |
除等于 |
a=4; a/=2; |
a=2; |
| %= |
模等于 |
a=3; a%2; |
a=1; |
1
2
3
4
5
6
7
8
9
10
11
12
13
14
15
16
17
18
19
20
21
22
23
24
25
26
27
28
29
30
31
32
33
34
35
36
37
38
39
| #define _CRT_SECURE_NO_WARNINGS 1
#include <iostream>
using namespace std;
int main()
{
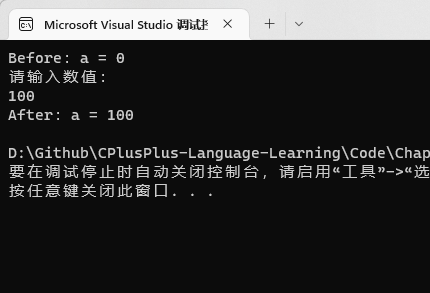
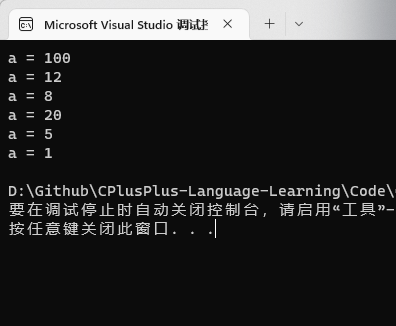
int a = 10;
a = 100;
cout << "a = " << a << endl;
a = 10;
a += 2;
cout << "a = " << a << endl;
a = 10;
a -= 2;
cout << "a = " << a << endl;
a = 10;
a *= 2;
cout << "a = " << a << endl;
a = 10;
a /= 2;
cout << "a = " << a << endl;
a = 10;
a /= 3;
cout << "a = " << a << endl;
return 0;
}
|
比较运算符
作用:用于表达式的比较,并返回一个真值或假值
比较运算符有以下符号:
| 运算符 |
术语 |
示例 |
结果 |
| == |
相等于 |
4 == 3 |
0 |
| != |
不等于 |
4 != 3 |
1 |
| < |
小于 |
4 < 3 |
0 |
| > |
大于 |
4 > 3 |
1 |
| <= |
小于等于 |
4 <= 3 |
0 |
| >= |
大于等于 |
4 >= 1 |
1 |
1
2
3
4
5
6
7
8
9
10
11
12
13
14
15
16
17
18
19
20
21
22
23
24
| #define _CRT_SECURE_NO_WARNINGS 1
#include <iostream>
using namespace std;
int main()
{
int a = 10;
int b = 20;
cout << (a == b) << endl;
cout << (a != b) << endl;
cout << (a > b) << endl;
cout << (a < b) << endl;
cout << (a >= b) << endl;
cout << (a <= b) << endl;
return 0;
}
|
注意:C和C++ 语言的比较运算中, “真”用数字“1”来表示, “假”用数字“0”来表示。
逻辑运算符
作用:用于根据表达式的值返回真值或假值
逻辑运算符有以下符号:
| 运算符 |
术语 |
示例 |
结果 |
| ! |
非 |
!a |
如果a为假,则!a为真; 如果a为真,则!a为假。 |
| && |
与 |
a && b |
如果a和b都为真,则结果为真,否则为假。 |
| || |
或 |
a || b |
如果a和b有一个为真,则结果为真,二者都为假时,结果为假。 |
1
2
3
4
5
6
7
8
9
10
11
12
13
14
15
16
17
18
19
20
21
22
23
24
25
| #define _CRT_SECURE_NO_WARNINGS 1
#include <iostream>
using namespace std;
int main()
{
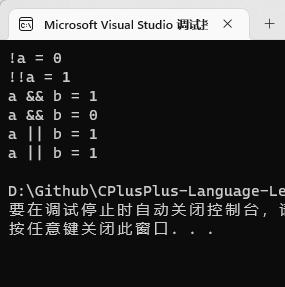
int a = 10;
cout << "!a = " << !a << endl;
cout << "!!a = " << !!a << endl;
int b = 10;
cout << "a && b = " << (a && b) << endl;
b = 0;
cout << "a && b = " << (a && b) << endl;
b = 10;
cout << "a || b = " << (a || b) << endl;
b = 0;
cout << "a || b = " << (a || b) << endl;
return 0;
}
|
程序流程结构
C/C++支持最基本的三种程序运行结构:顺序结构、选择结构、循环结构
- 顺序结构:程序按顺序执行,不发生跳转
- 选择结构:依据条件是否满足,有选择的执行相应功能
- 循环结构:依据条件是否满足,循环多次执行某段代码
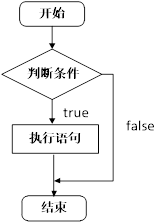
选择结构
if 语句
作用:执行满足条件的语句
if语句的三种形式
- 单行格式if语句
- 多行格式if语句
- 多条件的if语句
- 单行格式if语句:
if(条件){ 条件满足执行的语句 }
1
2
3
4
5
6
7
8
9
10
11
12
13
14
15
16
17
18
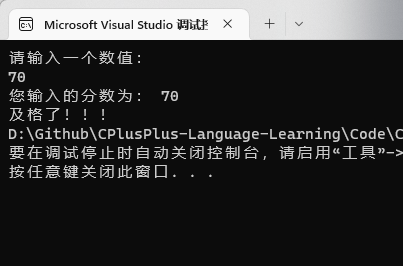
| #define _CRT_SECURE_NO_WARNINGS 1
#include <iostream>
using namespace std;
int main()
{
int score = 0;
cout << "请输入一个数值:" << endl;
cin >> score;
cout << "您输入的分数为: " << score << endl;
if (score >= 60)
{
cout << "及格了!!!";
}
return 0;
}
|
- 多行格式if语句:
if(条件){ 条件满足执行的语句 }else{ 条件不满足执行的语句 };
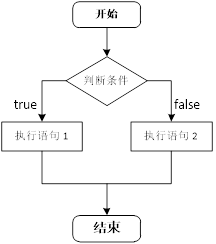
1
2
3
4
5
6
7
8
9
10
11
12
13
14
15
16
17
18
19
20
21
22
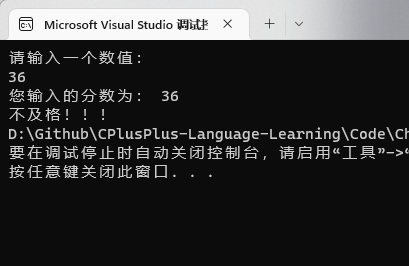
| #define _CRT_SECURE_NO_WARNINGS 1
#include <iostream>
using namespace std;
int main()
{
int score = 0;
cout << "请输入一个数值:" << endl;
cin >> score;
cout << "您输入的分数为: " << score << endl;
if (score >= 60)
{
cout << "及格了!!!";
}
else
{
cout << "不及格!!!";
}
return 0;
}
|
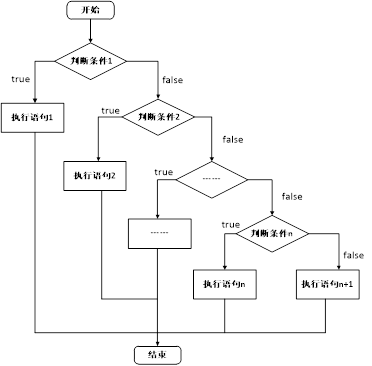
- 多条件的if语句:
if(条件1){ 条件1满足执行的语句 }else if(条件2){条件2满足执行的语句}... else{ 都不满足执行的语句}
1
2
3
4
5
6
7
8
9
10
11
12
13
14
15
16
17
18
19
20
21
22
23
24
25
26
27
28
29
30
31
32
33
34
| #define _CRT_SECURE_NO_WARNINGS 1
#include <iostream>
using namespace std;
int main()
{
int score = 0;
cout << "请输入一个数值:" << endl;
cin >> score;
cout << "您输入的分数为: " << score << endl;
if (score >= 90)
{
cout << "优秀";
}
else if (score >= 80 && score < 90)
{
cout << "良";
}
else if (score >= 70 && score < 80)
{
cout << "还行";
}
else if (score >= 60 && score < 70)
{
cout << "及格";
}
else
{
cout << "不及格";
}
return 0;
}
|
嵌套if语句:在if语句中,可以嵌套使用if语句,达到更精确的条件判断
案例需求:
- 提示用户输入一个高考考试分数,根据分数做如下判断
- 分数如果大于600分视为考上一本,大于500分考上二本,大于400考上三本,其余视为未考上本科;
- 在一本分数中,如果大于700分,考入北大,大于650分,考入清华,大于600考入人大。
1
2
3
4
5
6
7
8
9
10
11
12
13
14
15
16
17
18
19
20
21
22
23
24
25
26
27
28
29
30
31
32
33
34
35
36
37
38
39
40
41
42
43
44
45
46
| #define _CRT_SECURE_NO_WARNINGS 1
#include <iostream>
using namespace std;
int main() {
int score = 0;
cout << "请输入考试分数:" << endl;
cin >> score;
if (score > 600)
{
cout << "我考上了一本大学" << endl;
if (score > 700)
{
cout << "我考上了北大" << endl;
}
else if (score > 650)
{
cout << "我考上了清华" << endl;
}
else
{
cout << "我考上了人大" << endl;
}
}
else if (score > 500)
{
cout << "我考上了二本大学" << endl;
}
else if (score > 400)
{
cout << "我考上了三本大学" << endl;
}
else
{
cout << "我未考上本科" << endl;
}
system("pause");
return 0;
}
|
三目运算符(三元运算)
作用: 通过三目运算符实现简单的判断
语法:表达式1 ? 表达式2 :表达式3
解释:
如果表达式1的值为真,执行表达式2,并返回表达式2的结果。
如果表达式1的值为假,执行表达式3,并返回表达式3的结果。
1
2
3
4
5
6
7
8
9
10
11
12
13
14
15
16
17
18
19
20
21
22
23
| #define _CRT_SECURE_NO_WARNINGS 1
#include <iostream>
using namespace std;
int main()
{
int a = 10;
int b = 20;
int c = 0;
c = a > b ? a : b;
cout << "c = " << c << endl;
(a > b ? a : b) = 100;
cout << "a = " << a << endl;
cout << "b = " << b << endl;
cout << "c = " << c << endl;
return 0;
}
|
总结:和 if 语句比较,三目运算符优点是短小整洁,缺点是如果用嵌套,结构不清晰
switch 语句
作用:执行多条件分支语句
语法:
1
2
3
4
5
6
7
8
9
| switch(表达式)
{
case 结果1:执行语句;
break;
case 结果2:执行语句;
break;
...
default:执行语句;break;
}
|
1
2
3
4
5
6
7
8
9
10
11
12
13
14
15
16
17
18
19
20
21
22
23
24
25
26
27
28
29
30
| #define _CRT_SECURE_NO_WARNINGS 1
#include <iostream>
using namespace std;
int main()
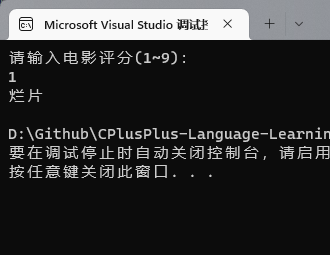
{
int score = 0;
cout << "请输入电影评分(1~9):" << endl;
cin >> score;
switch (score)
{
case 10:
case 9:
cout << "经典" << endl;
break;
case 8:
cout << "非常好" << endl;
break;
case 7:
case 6:
cout << "一般" << endl;
break;
default:
cout << "烂片" << endl;
break;
}
return 0;
}
|
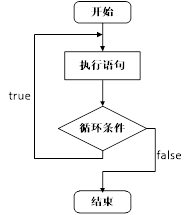
循环结构
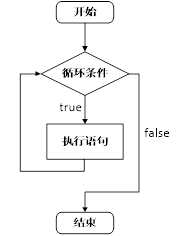
while 循环
作用:满足循环条件,执行循环语句
语法: while(循环条件){ 循环语句 }
解释:只要循环条件的结果为真,就执行循环语句
1
2
3
4
5
6
7
8
9
10
11
12
13
14
15
16
| #define _CRT_SECURE_NO_WARNINGS 1
#include <iostream>
using namespace std;
int main()
{
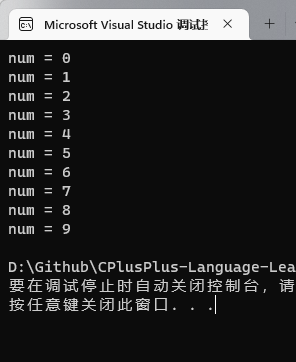
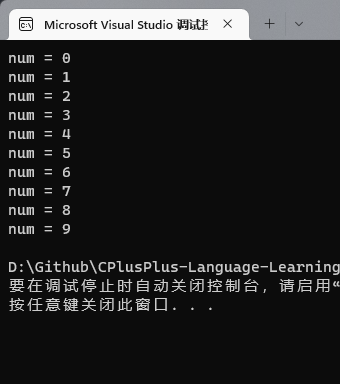
int num = 0;
while (num < 10)
{
cout << "num = " << num << endl;
num++;
}
return 0;
}
|
注意:在执行循环语句时候,程序必须提供跳出循环的出口,否则出现死循环
while循环练习案例:猜数字
案例描述:系统随机生成一个 1 到 100 之间的数字,玩家进行猜测,如果猜错,提示玩家数字过大或过小,如果猜对恭喜玩家胜利,并且退出游戏。
1
2
3
4
5
6
7
8
9
10
11
12
13
14
15
16
17
18
19
20
21
22
23
24
25
26
27
28
29
| #define _CRT_SECURE_NO_WARNINGS 1
#include <iostream>
using namespace std;
int main()
{
int num = 54;
int input = 0;
while (1)
{
cout << "请用户输入一个数值(1~100):" << endl;
cin >> input;
if (input > num)
{
cout << "猜大了" << endl;
}
else if (input < num)
{
cout << "猜小了" << endl;
}
else
{
cout << "猜对了" << endl;
break;
}
}
return 0;
}
|
do…while 循环
作用: 满足循环条件,执行循环语句
语法: do{ 循环语句 } while(循环条件);
注意:与while的区别在于 do...while会先执行一次循环语句,再判断循环条件
1
2
3
4
5
6
7
8
9
10
11
12
13
14
15
| #define _CRT_SECURE_NO_WARNINGS 1
#include <iostream>
using namespace std;
int main()
{
int num = 0;
do
{
cout << "num = " << num << endl;
num++;
} while (num < 10);
return 0;
}
|
总结:
与 while 循环区别在于,do…while 先执行一次循环语句,再判断循环条件
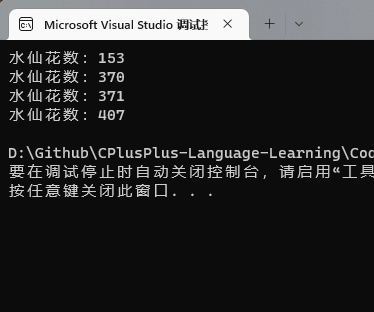
练习案例:水仙花数
案例描述:水仙花数是指一个 3 位数,它的每个位上的数字的 3 次幂之和等于它本身
例如:$1^3$ + $5^3$+ $3^3$ = 153
请利用do…while语句,求出所有3位数中的水仙花数
1
2
3
4
5
6
7
8
9
10
11
12
13
14
15
16
17
18
19
20
21
22
23
24
25
26
27
28
| #define _CRT_SECURE_NO_WARNINGS 1
#include <iostream>
using namespace std;
int main()
{
int a = 100;
do
{
int x = a % 10;
int y = a / 10 % 10;
int z = a / 100;
if ((z * z * z + y * y * y + x * x * x) == a)
{
cout << "水仙花数:" << a << endl;
}
a++;
} while (a < 1000);
return 0;
}
|
for 循环
作用: 满足循环条件,执行循环语句
语法: for(起始表达式;条件表达式;末尾循环体) { 循环语句; }
1
2
3
4
5
6
7
8
9
10
11
12
13
14
| #define _CRT_SECURE_NO_WARNINGS 1
#include <iostream>
using namespace std;
int main()
{
int i = 0;
for ( i = 0; i < 10; i++)
{
cout << i << " ";
}
return 0;
}
|
详解:
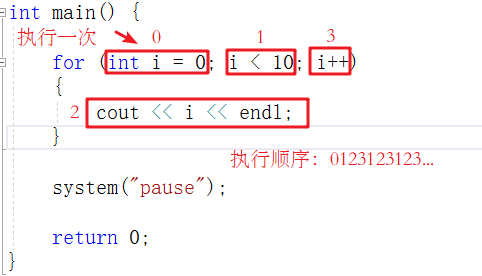
注意:
for循环中的表达式,要用分号进行分隔
总结:
while , do…while, for都是开发中常用的循环语句,for循环结构比较清晰,比较常用
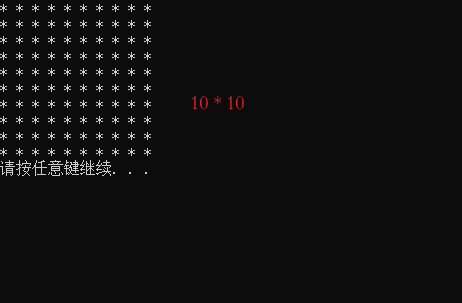
嵌套循环
作用: 在循环体中再嵌套一层循环,解决一些实际问题
例如我们想在屏幕中打印如下图片,就需要利用嵌套循环
1
2
3
4
5
6
7
8
9
10
11
12
13
14
15
16
17
18
| #define _CRT_SECURE_NO_WARNINGS 1
#include <iostream>
using namespace std;
int main()
{
for (int i = 0; i < 10; i++)
{
for (int j = 0; j < 10; j++)
{
cout << "*" << " ";
}
cout << endl;
}
return 0;
}
|
练习案例:乘法口诀表
案例描述:利用嵌套循环,实现九九乘法表
1
2
3
4
5
6
7
8
9
10
11
12
13
14
15
16
17
18
19
20
| #define _CRT_SECURE_NO_WARNINGS 1
#include <iostream>
using namespace std;
int main()
{
int i = 0;
for ( i = 1; i < 10; i++)
{
int j = 0;
for (j = 1; j <= i; j++)
{
cout << i << " * " << j << " = " << i * j << " ";
}
cout << endl;
}
return 0;
}
|
跳转语句
break 语句
作用: 用于跳出 选择结构 或者 循环结构
break 使用的时机:
- 出现在 switch 条件语句中,作用是终止 case 并跳出 switch
- 出现在循环语句中,作用是跳出当前的循环语句
- 出现在嵌套循环中,跳出最近的内层循环语句
示例1:
1
2
3
4
5
6
7
8
9
10
11
12
13
14
15
16
17
18
19
20
21
22
23
24
25
26
27
28
| int main() {
cout << "请选择您挑战副本的难度:" << endl;
cout << "1、普通" << endl;
cout << "2、中等" << endl;
cout << "3、困难" << endl;
int num = 0;
cin >> num;
switch (num)
{
case 1:
cout << "您选择的是普通难度" << endl;
break;
case 2:
cout << "您选择的是中等难度" << endl;
break;
case 3:
cout << "您选择的是困难难度" << endl;
break;
}
system("pause");
return 0;
}
|
示例2:
1
2
3
4
5
6
7
8
9
10
11
12
13
14
15
| int main() {
for (int i = 0; i < 10; i++)
{
if (i == 5)
{
break;
}
cout << i << endl;
}
system("pause");
return 0;
}
|
示例3:
1
2
3
4
5
6
7
8
9
10
11
12
13
14
15
16
17
18
19
| int main() {
for (int i = 0; i < 10; i++)
{
for (int j = 0; j < 10; j++)
{
if (j == 5)
{
break;
}
cout << "*" << " ";
}
cout << endl;
}
system("pause");
return 0;
}
|
continue 语句
作用:在 循环语句 中,跳过本次循环中余下尚未执行的语句,继续执行下一次循环
示例:
1
2
3
4
5
6
7
8
9
10
11
12
13
14
15
| int main() {
for (int i = 0; i < 100; i++)
{
if (i % 2 == 0)
{
continue;
}
cout << i << endl;
}
system("pause");
return 0;
}
|
注意:continue并没有使整个循环终止,而break会跳出循环
goto 语句
作用:可以无条件跳转语句
语法:goto 标记;
解释:如果标记的名称存在,执行到goto语句时,会跳转到标记的位置
示例:
1
2
3
4
5
6
7
8
9
10
11
12
13
14
15
16
17
18
| int main() {
cout << "1" << endl;
goto FLAG;
cout << "2" << endl;
cout << "3" << endl;
cout << "4" << endl;
FLAG:
cout << "5" << endl;
system("pause");
return 0;
}
|
注意:在程序中不建议使用goto语句,以免造成程序流程混乱
数组
所谓数组,就是一个集合,里面存放了相同类型的数据元素
特点1:数组中的每个 数据元素都是相同的数据类型
特点2:数组是由 连续的内存 位置组成的
一维数组
定义
一维数组定义的三种方式:
数据类型 数组名[ 数组长度 ]; 数据类型 数组名[ 数组长度 ] = { 值1,值2 ...};数据类型 数组名[ ] = { 值1,值2 ...};
1
2
3
4
5
6
7
8
9
10
11
12
13
14
15
16
17
18
19
20
21
22
23
24
25
26
27
28
29
30
31
32
33
34
35
36
| #define _CRT_SECURE_NO_WARNINGS 1
#include <iostream>
using namespace std;
int main()
{
int arr1[10];
int arr2[10] = { 1,2,3,4,5,6,7,8,9,0 };
int arr3[] = { 1,2,3,4,5,6,7,8,9 };
arr1[0] = 100;
arr1[1] = 10;
arr1[2] = 11;
arr1[3] = 98;
cout << "arr1[0] = " << arr1[0] << endl;
cout << "arr1[1] = " << arr1[1] << endl;
cout << "arr1[2] = " << arr1[2] << endl;
int i = 0;
for (i = 0; i < 10; i++)
{
cout << "arr[" << i << "] = " << arr2[i] << endl;
}
return 0;
}
|
总结1:
数组名的命名规范与变量名命名规范一致,不要和变量重名
总结2:
数组中下标是从0开始索引
数组名
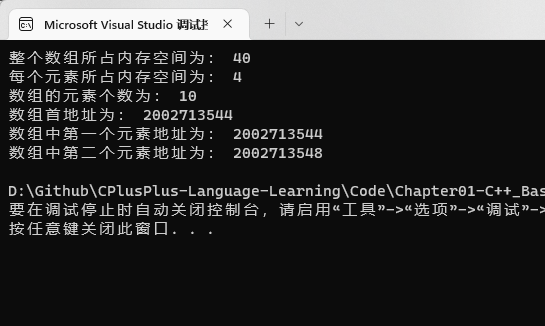
一维数组名称的用途:
- 可以统计整个数组在内存中的长度
- 可以获取数组在内存中的首地址
1
2
3
4
5
6
7
8
9
10
11
12
13
14
15
16
17
18
19
20
21
22
23
| #define _CRT_SECURE_NO_WARNINGS 1
#include <iostream>
using namespace std;
int main()
{
int arr[10] = { 1,2,3,4,5,6,7,8,9,10 };
cout << "整个数组所占内存空间为: " << sizeof(arr) << endl;
cout << "每个元素所占内存空间为: " << sizeof(arr[0]) << endl;
cout << "数组的元素个数为: " << sizeof(arr) / sizeof(arr[0]) << endl;
cout << "数组首地址为: " << (int)arr << endl;
cout << "数组中第一个元素地址为: " << (int)&arr[0] << endl;
cout << "数组中第二个元素地址为: " << (int)&arr[1] << endl;
return 0;
}
|
注意:
数组名是常量,不可以赋值
总结1:
直接打印数组名,可以查看数组所占内存的首地址
总结2:
对数组名进行 sizeof,可以获取整个数组占内存空间的大小
冒泡排序
作用: 最常用的排序算法,对数组内元素进行排序
- 比较相邻的元素。如果第一个比第二个大,就交换他们两个。
- 对每一对相邻元素做同样的工作,执行完毕后,找到第一个最大值。
- 重复以上的步骤,每次比较次数-1,直到不需要比较

1
2
3
4
5
6
7
8
9
10
11
12
13
14
15
16
17
18
19
20
21
22
23
24
25
26
27
| #define _CRT_SECURE_NO_WARNINGS 1
#include <iostream>
using namespace std;
int main()
{
int arr[10] = { 4,2,8,0,5,7,1,3,9,6 };
int i = 0;
for (i = 0; i < 10 - i; i++)
{
int j = 0;
for (j = 0; j < 10 - i - 1; j++)
{
if (arr[j] > arr[j + 1])
{
int temp = arr[j];
arr[j] = arr[j + 1];
arr[j + 1] = temp;
}
}
}
for (int i = 0; i < 10; i++)
{
cout << arr[i] << endl;
}
}
|
二维数组
定义
二维数组定义的四种方式:
数据类型 数组名[ 行数 ][ 列数 ];数据类型 数组名[ 行数 ][ 列数 ] = { {数据1,数据2 } ,{数据3,数据4 } };数据类型 数组名[ 行数 ][ 列数 ] = { 数据1,数据2,数据3,数据4}; 数据类型 数组名[ ][ 列数 ] = { 数据1,数据2,数据3,数据4};
建议:以上4种定义方式,利用 第二种更加直观,提高代码的可读性
1
2
3
4
5
6
7
8
9
10
11
12
13
14
15
16
17
18
19
20
21
22
23
24
25
26
27
28
29
30
31
32
33
34
35
36
37
38
39
40
41
42
43
| #define _CRT_SECURE_NO_WARNINGS 1
#include <iostream>
using namespace std;
int main() {
int arr[2][3];
arr[0][0] = 1;
arr[0][1] = 2;
arr[0][2] = 3;
arr[1][0] = 4;
arr[1][1] = 5;
arr[1][2] = 6;
for (int i = 0; i < 2; i++)
{
for (int j = 0; j < 3; j++)
{
cout << arr[i][j] << " ";
}
cout << endl;
}
int arr2[2][3] =
{
{1,2,3},
{4,5,6}
};
int arr3[2][3] = { 1,2,3,4,5,6 };
int arr4[][3] = { 1,2,3,4,5,6 };
return 0;
}
|
总结:在定义二维数组时,如果初始化了数据,可以省略行数
数组名
1
2
3
4
5
6
7
8
9
10
11
12
13
14
15
16
17
18
19
20
21
22
23
24
25
26
27
28
29
30
| #define _CRT_SECURE_NO_WARNINGS 1
#include <iostream>
using namespace std;
int main() {
int arr[2][3] =
{
{1,2,3},
{4,5,6}
};
cout << "二维数组大小: " << sizeof(arr) << endl;
cout << "二维数组一行大小: " << sizeof(arr[0]) << endl;
cout << "二维数组元素大小: " << sizeof(arr[0][0]) << endl;
cout << "二维数组行数: " << sizeof(arr) / sizeof(arr[0]) << endl;
cout << "二维数组列数: " << sizeof(arr[0]) / sizeof(arr[0][0]) << endl;
cout << "二维数组首地址:" << arr << endl;
cout << "二维数组第一行地址:" << arr[0] << endl;
cout << "二维数组第二行地址:" << arr[1] << endl;
cout << "二维数组第一个元素地址:" << &arr[0][0] << endl;
cout << "二维数组第二个元素地址:" << &arr[0][1] << endl;
return 0;
}
|
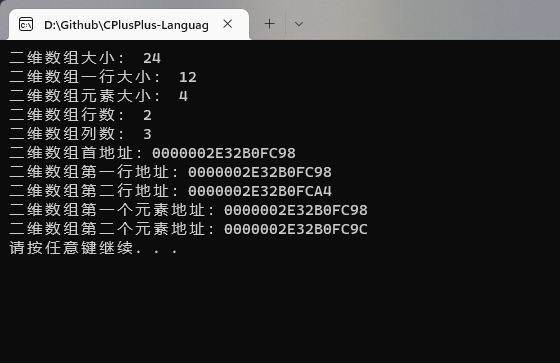
总结1:
二维数组名就是这个数组的首地址
总结2:
对二维数组名进行sizeof时,可以获取整个二维数组占用的内存空间大小
函数
作用:将一段经常使用的代码封装起来,减少重复代码
一个较大的程序,一般分为若干个程序块,每个模块实现特定的功能。
定义
函数的定义一般主要有5个步骤:
1、返回值类型
2、函数名
3、参数表列
4、函数体语句
5、return 表达式
语法:
1
2
3
4
5
| 返回值类型 函数名 (参数列表)
{
函数体语句
return表达式
}
|
- 返回值类型 :一个函数可以返回一个值。在函数定义中
- 函数名:给函数起个名称
- 参数列表:使用该函数时,传入的数据
- 函数体语句:花括号内的代码,函数内需要执行的语句
- return表达式: 和返回值类型挂钩,函数执行完后,返回相应的数据
1
2
3
4
5
6
7
8
9
10
11
12
13
14
15
16
17
18
19
20
21
22
| #define _CRT_SECURE_NO_WARNINGS 1
#include <iostream>
using namespace std;
int Sum(int x, int y);
int main()
{
int a = 10;
int b = 20;
int res = Sum(a, b);
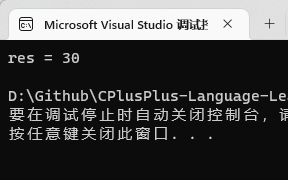
cout << "res = " << res << endl;
return 0;
}
int Sum(int x, int y)
{
int result = x + y;
return result;
}
|
值传递
- 所谓值传递,就是函数调用时实参将数值传入给形参
- 值传递时,
如果形参发生,并不会影响实参
1
2
3
4
5
6
7
8
9
10
11
12
13
14
15
16
17
18
19
20
21
22
23
24
25
26
27
28
29
30
31
32
33
34
35
| #define _CRT_SECURE_NO_WARNINGS 1
#include <iostream>
using namespace std;
void swap(int num1, int num2)
{
cout << "交换前:" << endl;
cout << "num1 = " << num1 << endl;
cout << "num2 = " << num2 << endl;
int temp = num1;
num1 = num2;
num2 = temp;
cout << "交换后:" << endl;
cout << "num1 = " << num1 << endl;
cout << "num2 = " << num2 << endl;
}
int main() {
int a = 10;
int b = 20;
swap(a, b);
cout << "mian中的 a = " << a << endl;
cout << "mian中的 b = " << b << endl;
system("pause");
return 0;
}
|
总结:
值传递时,形参是修饰不了实参的
常见样式
常见的函数样式有4种:
- 无参无返
- 有参无返
- 无参有返
- 有参有返
1
2
3
4
5
6
7
8
9
10
11
12
13
14
15
16
17
18
19
20
21
22
23
24
25
26
27
28
29
30
|
void test01()
{
cout << "this is test01" << endl;
}
void test02(int a)
{
cout << "this is test02" << endl;
cout << "a = " << a << endl;
}
int test03()
{
cout << "this is test03 " << endl;
return 10;
}
int test04(int a, int b)
{
cout << "this is test04 " << endl;
int sum = a + b;
return sum;
}
|
函数的声明
作用: 告诉编译器函数名称及如何调用函数。函数的实际主体可以单独定义。
1
2
3
4
5
6
7
8
9
10
11
12
13
14
15
16
17
18
19
20
21
|
int max(int a, int b);
int max(int a, int b);
int max(int a, int b)
{
return a > b ? a : b;
}
int main() {
int a = 100;
int b = 200;
cout << max(a, b) << endl;
system("pause");
return 0;
}
|
函数文件分类
作用:让代码结构更加清晰
函数分文件编写一般有4个步骤
- 创建后缀名为.h的头文件
- 创建后缀名为.cpp的源文件
- 在头文件中写函数的声明
- 在源文件中写函数的定义
示例:
1
2
3
4
5
6
|
#include<iostream>
using namespace std;
void swap(int a, int b);
|
1
2
3
4
5
6
7
8
9
10
11
12
|
#include "swap.h"
void swap(int a, int b)
{
int temp = a;
a = b;
b = temp;
cout << "a = " << a << endl;
cout << "b = " << b << endl;
}
|
1
2
3
4
5
6
7
8
9
10
11
12
|
#include "swap.h"
int main() {
int a = 100;
int b = 200;
swap(a, b);
system("pause");
return 0;
}
|
指针
概念
指针的作用: 可以通过指针间接访问内存
- 内存编号是从0开始记录的,一般用十六进制数字表示
- 可以利用指针变量保存地址
定义和使用
指针变量定义语法: 数据类型 * 变量名;
1
2
3
4
5
6
7
8
9
10
11
12
13
14
15
16
17
18
19
20
21
| #define _CRT_SECURE_NO_WARNINGS 1
#include <iostream>
using namespace std;
int main()
{
int a = 10;
int* p = &a;
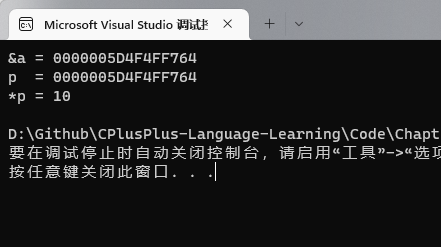
cout << "&a = " << &a << endl;
cout << "p = " << p << endl;
cout << "*p = " << *p << endl;
return 0;
}
|
指针变量和普通变量的区别
- 普通变量存放的是数据,指针变量存放的是地址
- 指针变量可以通过 “ * “ 操作符,操作指针变量指向的内存空间,这个过程称为解引用
总结1:
我们可以通过 & 符号 获取变量的地址
总结2:
利用指针可以记录地址
总结3:
对指针变量解引用,可以操作指针指向的内存
指针所占内存空间
1
2
3
4
5
6
7
8
9
10
11
12
13
14
15
16
17
18
19
20
| #define _CRT_SECURE_NO_WARNINGS 1
#include <iostream>
using namespace std;
int main()
{
int a = 10;
int* p;
p = &a;
cout << *p << endl;
cout << sizeof(p) << endl;
cout << sizeof(char*) << endl;
cout << sizeof(float*) << endl;
cout << sizeof(double*) << endl;
return 0;
}
|

总结:
- 所有指针类型在 32 位操作系统下是 4 个字节
- 所有指针类型在 64 位操作系统下是 8 个字节
空指针和野指针
空指针:指针变量指向内存中编号为0的空间
用途:初始化指针变量
注意:空指针指向的内存是不可以访问的
1
2
3
4
5
6
7
8
9
10
11
12
13
| #define _CRT_SECURE_NO_WARNINGS 1
#include <iostream>
using namespace std
int main()
{
int* p = NULL;
cout << *p << endl;
return 0;
}
|
野指针:指针变量指向非法的内存空间
1
2
3
4
5
6
7
8
9
10
11
12
13
| #define _CRT_SECURE_NO_WARNINGS 1
#include <iostream>
using namespace std
int main()
{
int* p = (int*)0x1100;
cout << *p << endl;
return 0;
}
|
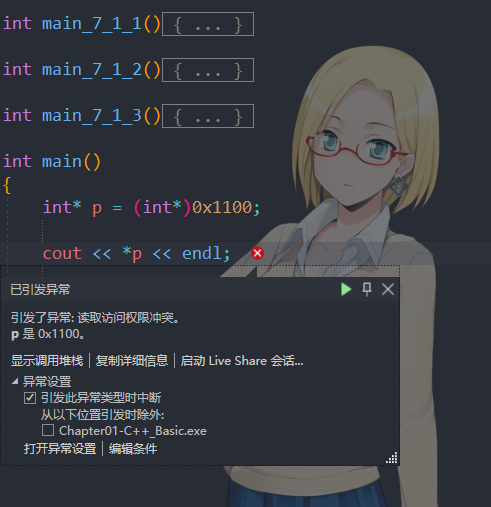
总结:空指针和野指针都不是我们申请的空间,因此不要访问。
const 修饰指针
const修饰指针有三种情况
- const修饰指针 — 常量指针
- const修饰常量 — 指针常量
- const即修饰指针,又修饰常量
1
2
3
4
5
6
7
8
9
10
11
12
13
14
15
16
17
18
19
20
21
22
23
24
25
26
| #define _CRT_SECURE_NO_WARNINGS 1
#include <iostream>
using namespace std;
int main()
{
int a = 10;
int b = 10;
const int* p1 = &a;
p1 = &b;
int* const p2 = &a;
*p2 = 100;
const int* const p3 = &a;
return 0;
}
|
指针和数组
作用:利用指针访问数组中元素
1
2
3
4
5
6
7
8
9
10
11
12
13
14
15
16
17
18
19
20
21
22
23
| #define _CRT_SECURE_NO_WARNINGS 1
#include <iostream>
using namespace std;
int main()
{
int arr[] = { 1,2,3,4,5,6,7,8,9,10 };
int* p = arr;
cout << "第一个元素: " << arr[0] << endl;
cout << "指针访问第一个元素: " << *p << endl;
for (int i = 0; i < 10; i++)
{
cout << *p << endl;
p++;
}
return 0;
}
|
指针和函数
作用:利用指针作函数参数,可以修改实参的值
1
2
3
4
5
6
7
8
9
10
11
12
13
14
15
16
17
18
19
20
21
22
23
24
25
26
27
28
29
30
31
32
33
34
| #define _CRT_SECURE_NO_WARNINGS 1
#include <iostream>
using namespace std;
void swap1(int a ,int b)
{
int temp = a;
a = b;
b = temp;
}
void swap2(int * p1, int *p2)
{
int temp = *p1;
*p1 = *p2;
*p2 = temp;
}
int main() {
int a = 10;
int b = 20;
swap1(a, b);
swap2(&a, &b);
cout << "a = " << a << endl;
cout << "b = " << b << endl;
system("pause");
return 0;
}
|
总结:
如果不想修改实参,就用值传递,如果想修改实参,就用地址传递
指针、数组、函数
案例描述:封装一个函数,利用冒泡排序,实现对整型数组的升序排序
例如数组:int arr[10] = { 4,3,6,9,1,2,10,8,7,5 };
1
2
3
4
5
6
7
8
9
10
11
12
13
14
15
16
17
18
19
20
21
22
23
24
25
26
27
28
29
30
31
32
33
34
35
36
37
38
39
40
41
42
| #define _CRT_SECURE_NO_WARNINGS 1
#include <iostream>
using namespace std;
void BubbleSort(int* arr, int len);
void printArray(int arr[], int len);
int main()
{
int arr[10] = { 4,3,6,9,1,2,10,8,7,5 };
int len = sizeof(arr) / sizeof(int);
BubbleSort(arr, len);
printArray(arr, len);
return 0;
}
void BubbleSort(int* arr, int len)
{
for (int i = 0; i < len - 1; i++)
{
for (int j = 0; j < len - 1 - i; j++)
{
if (arr[j] > arr[j + 1])
{
int temp = arr[j];
arr[j] = arr[j + 1];
arr[j + 1] = temp;
}
}
}
}
void printArray(int arr[], int len)
{
for (int i = 0; i < len; i++)
{
cout << arr[i] << endl;
}
}
|
总结:当数组名传入到函数作为参数时,被退化为指向首元素的指针
结构体
定义
结构体属于用户 自定义的数据类型,允许用户存储不同的数据类型
语法:struct 结构体名 { 结构体成员列表 };
通过结构体创建变量的方式有三种:
- struct 结构体名 变量名
- struct 结构体名 变量名 = { 成员1值 , 成员2值…}
- 定义结构体时顺便创建变量
1
2
3
4
5
6
7
8
9
10
11
12
13
14
15
16
17
18
19
20
21
22
23
24
25
26
27
28
29
30
31
32
33
34
35
36
37
38
39
40
41
42
43
44
45
46
47
48
| #define _CRT_SECURE_NO_WARNINGS 1
#include <iostream>
using namespace std;
struct Student
{
string name;
int age;
int score;
} stu3;
int main()
{
struct Student stu1;
stu1.name = "Edmond";
stu1.age = 23;
stu1.score = 98;
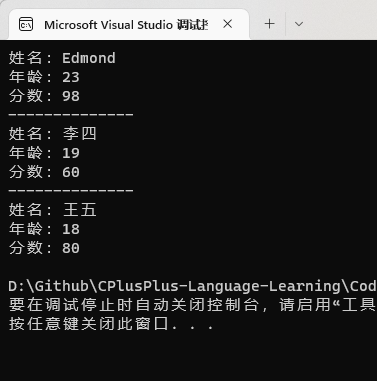
cout << "姓名:" << stu1.name << endl;
cout << "年龄:" << stu1.age << endl;
cout << "分数:" << stu1.score << endl;
cout << "--------------" << endl;
struct Student stu2 = { "李四", 19, 60 };
cout << "姓名:" << stu2.name << endl;
cout << "年龄:" << stu2.age << endl;
cout << "分数:" << stu2.score << endl;
cout << "--------------" << endl;
stu3.name = "王五";
stu3.age = 18;
stu3.score = 80;
cout << "姓名:" << stu3.name << endl;
cout << "年龄:" << stu3.age << endl;
cout << "分数:" << stu3.score << endl;
return 0;
}
|
总结1:
定义结构体时的关键字是struct,不可省略
总结2:
创建结构体变量时,关键字struct可以省略
总结3:
结构体变量利用操作符 ‘’.’’ 访问成员
结构体数组
作用:将自定义的结构体放入到数组中方便维护
语法: struct 结构体名 数组名[元素个数] = { {} , {} , ... {} }
1
2
3
4
5
6
7
8
9
10
11
12
13
14
15
16
17
18
19
20
21
22
23
24
25
26
27
28
29
30
31
32
33
| #define _CRT_SECURE_NO_WARNINGS 1
#include <iostream>
using namespace std;
struct Student
{
string name;
int age;
int score;
};
int main()
{
struct Student arr[3] =
{
{"zs", 18, 76},
{"ls", 20, 86},
{"ww", 22, 79}
};
int i = 0;
for (i = 0; i < 3; i++)
{
cout << "姓名:" << arr[i].name << endl;
cout << "年龄:" << arr[i].age << endl;
cout << "分数:" << arr[i].score << "\n" << endl;
}
return 0;
}
|

结构体指针
作用:通过指针访问结构体中的成员
- 利用操作符
-> 可以通过结构体指针访问结构体属性
1
2
3
4
5
6
7
8
9
10
11
12
13
14
15
16
17
18
19
20
21
22
23
24
25
26
27
28
| #define _CRT_SECURE_NO_WARNINGS 1
#include <iostream>
using namespace std;
struct Student
{
string name;
int age;
int score;
};
int main()
{
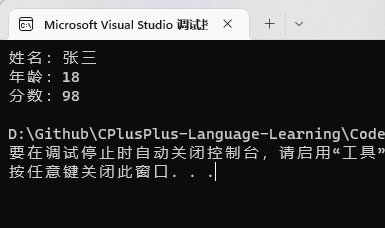
struct Student stu = { "张三",18,100, };
struct Student* ps = &stu;
ps->score = 98;
cout << "姓名:" << ps->name << endl;
cout << "年龄:" << ps->age << endl;
cout << "分数:" << ps->score << endl;
return 0;
}
|
总结:结构体指针可以通过 -> 操作符 来访问结构体中的成员
结构体嵌套结构体
作用: 结构体中的成员可以是另一个结构体
例如:每个老师辅导一个学员,一个老师的结构体中,记录一个学生的结构体
1
2
3
4
5
6
7
8
9
10
11
12
13
14
15
16
17
18
19
20
21
22
23
24
25
26
27
28
29
30
31
32
33
34
35
36
37
38
39
40
| #define _CRT_SECURE_NO_WARNINGS 1
#include <iostream>
using namespace std;
struct Student
{
string name;
int age;
int score;
} stu3;
struct Teacher
{
int id;
string name;
int age;
struct Student stu;
};
int main()
{
struct Teacher t1;
t1.id = 10000;
t1.name = "老王";
t1.age = 40;
t1.stu.name = "张三";
t1.stu.age = 18;
t1.stu.score = 100;
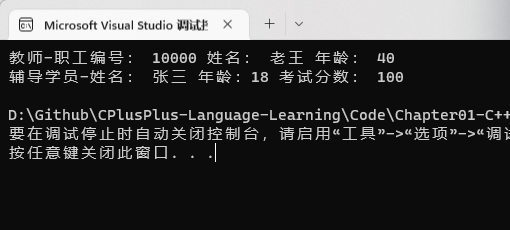
cout << "教师-职工编号: " << t1.id << " 姓名: " << t1.name << " 年龄: " << t1.age << endl;
cout << "辅导学员-姓名: " << t1.stu.name << " 年龄:" << t1.stu.age << " 考试分数: " << t1.stu.score << endl;
return 0;
}
|
总结:在结构体中可以定义另一个结构体作为成员,用来解决实际问题
结构体做函数参数
作用:将结构体作为参数向函数中传递
传递方式有两种:
1
2
3
4
5
6
7
8
9
10
11
12
13
14
15
16
17
18
19
20
21
22
23
24
25
26
27
28
29
30
31
32
33
34
35
36
37
38
39
40
41
42
43
44
45
46
47
48
49
50
| #define _CRT_SECURE_NO_WARNINGS 1
#include <iostream>
using namespace std;
struct Student
{
string name;
int age;
int score;
};
void printStudent(Student stu)
{
stu.age = 28;
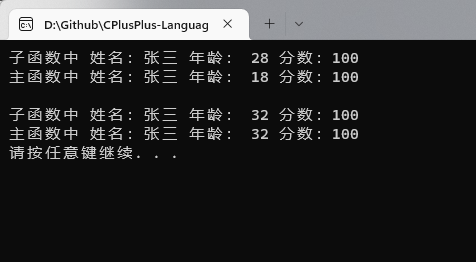
cout << "子函数中 姓名:" << stu.name
<< " 年龄: " << stu.age
<< " 分数:" << stu.score << endl;
}
void printStudent2(Student* stu)
{
stu->age = 32;
cout << "子函数中 姓名:" << stu->name
<< " 年龄: " << stu->age
<< " 分数:" << stu->score << endl;
}
int main() {
Student stu = { "张三",18,100 };
printStudent(stu);
cout << "主函数中 姓名:" << stu.name
<< " 年龄: " << stu.age
<< " 分数:" << stu.score << endl;
cout << endl;
printStudent2(&stu);
cout << "主函数中 姓名:" << stu.name
<< " 年龄: " << stu.age
<< " 分数:" << stu.score << endl;
return 0;
}
|
总结:如果不想修改主函数中的数据,用值传递,反之用地址传递
const 场景
作用:用const来防止误操作
1
2
3
4
5
6
7
8
9
10
11
12
13
14
15
16
17
18
19
20
21
22
23
|
struct student
{
string name;
int age;
int score;
};
void printStudent(const student *stu)
{
cout << "姓名:" << stu->name << " 年龄:" << stu->age << " 分数:" << stu->score << endl;
}
int main() {
student stu = { "张三",18,100 };
printStudent(&stu);
return 0;
}
|
结构体案例
案例1
案例描述:
学校正在做毕设项目,每名老师带领5个学生,总共有3名老师,需求如下
设计学生和老师的结构体,其中在老师的结构体中,有老师姓名和一个存放5名学生的数组作为成员
学生的成员有姓名、考试分数,创建数组存放3名老师,通过函数给每个老师及所带的学生赋值
最终打印出老师数据以及老师所带的学生数据。
1
2
3
4
5
6
7
8
9
10
11
12
13
14
15
16
17
18
19
20
21
22
23
24
25
26
27
28
29
30
31
32
33
34
35
36
37
38
39
40
41
42
43
44
45
46
47
48
49
50
51
52
53
54
55
| #define _CRT_SECURE_NO_WARNINGS 1
#include <iostream>
using namespace std;
struct Student
{
string name;
int score;
};
struct Teacher
{
string name;
Student sArray[5];
};
void allocateSpace(Teacher tArray[], int len)
{
string tName = "教师";
string sName = "学生";
string nameSeed = "ABCDE";
for (int i = 0; i < len; i++)
{
tArray[i].name = tName + nameSeed[i];
for (int j = 0; j < 5; j++)
{
tArray[i].sArray[j].name = sName + nameSeed[j];
tArray[i].sArray[j].score = rand() % 61 + 40;
}
}
}
void printTeachers(Teacher tArray[], int len)
{
for (int i = 0; i < len; i++)
{
cout << tArray[i].name << endl;
for (int j = 0; j < 5; j++)
{
cout << "\t姓名:" << tArray[i].sArray[j].name << " 分数:" << tArray[i].sArray[j].score << endl;
}
}
}
int main() {
srand((unsigned int)time(NULL));
Teacher tArray[3];
int len = sizeof(tArray) / sizeof(Teacher);
allocateSpace(tArray, len);
printTeachers(tArray, len);
return 0;
}
|