本节分为五部分:
C++ 11 的 thread 多线程类
线程间互斥 - mutex 互斥锁和 lock_guard 自动释放锁
线程间同步通信 - 生产者消费者模型
再谈 lock_guard 和 unique_lock
基于 CAS 操作的 atomic 原子类型
什么是多线程?
多线程(multithreading) :是指从软件或者硬件上实现多个线程并发执行的技术。具有多线程能力的计算机因有硬件支持而能够在同一时间执行多于一个线程,进而提升整体处理性能。
在一个程序中,这些独立运行的程序片段叫作“线程”(Thread),利用它编程的概念就叫作“多线程处理”。
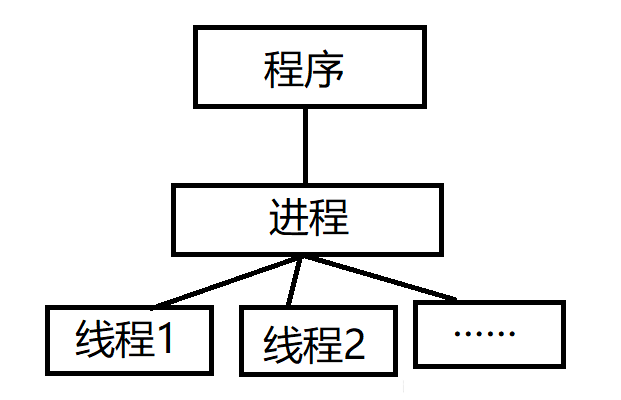
进程与线程:
进程是正在运行的程序的实例,而线程是是进程中的实际运作单位。
线程是操作系统能够进行运算调度的最小单位 。被包含在进程之中,是进程的实际运作单位 。一条线程指的是进程中一个单一顺序的控制流,一个进程可以并发执行多个线程,每个线程会执行不同的任务。
区别:
一个程序有且只有一个进程,但可以拥有至少一个的线程。
不同进程拥有不同的地址空间,互不相关,而不同线程共同拥有相同进程的地址空间。
1. C++ 11 的 thread 多线程类 C++11 新标准中引入了四个头文件来支持多线程编程,他们分别是<atomic> ,<thread>,<mutex>,<condition_variable> 和 <future>。
<atomic>:该头文件主要声明两个类:
std::atomicstd::atomic_flag
<thread>:该头文件主要声明一个类:
std::thread另外 std::this_thread 命名空间也在该头文件中。
<mutex>:该头文件主要声明了与互斥量(mutex)相关的类:
std::mutexstd::lock_guardstd::unique_lock
<condition_variable>:该头文件主要声明了与条件变量相关的类:
std::condition_variablestd::condition_varible_any
<future>:该头文件主要声明了两个 Provider 类和 两个 Futrue 类:
std::promise:Provider 类std::package_task:Provider 类std::future:Futrue 类std::shared_futrue:Futrue 类std::async() 函数声明在该文件中。
1. 开启和关闭线程 在语言级别 ,一般调用 std 名称空间的 thread 类来启动一个线程。
其对应操作系统层次的一下系统调用:
1
2
windows: createThread
以下是 thread 类的一个构造函数:
1
2
template <class Fn , class ... Args>explicit thread (Fn&& fn, Args&&... args)
可以看到,其需要一个线程函数(也可以是类对象和 lambda 表达式)以及这个函数所需要传入的参数 。
引入头文件:
创建线程对象:
1 2 3 4 5 6 7 8 9 10 11 12 13 14 15 16 17 18 19 20 21 22 23 24 25 26 27 28 29 #include <iostream> #include <thread> using namespace std;void threadHadnle1 (int time) sleep_for (std::chrono::seconds (time));"hello thread1!" << endl;void threadHadnle2 (int time) sleep_for (std::chrono::seconds (time));"hello thread2!" << endl;int main () std::thread t1 (threadHadnle1, 2 ) ;std::thread t2 (threadHadnle1, 3 ) ;"main thread done" << endl;return 0 ;
原因:
主线程运行完成后,查看如果当前进程还有未运行完成的子线程,进程就会异常终止。
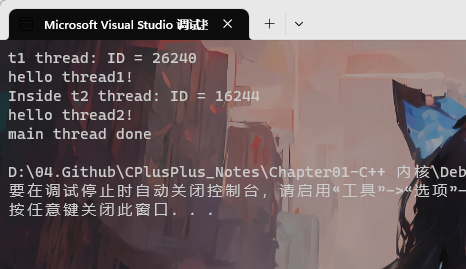
线程除了站在我们角度上的以名字区分,它还有一个属于自己的 id!通过 std::thread::get_id() 便可以获取到该成员对象线程的 id。
1 cout << "t1 thread: ID = " << t1.get_id () << endl;
而在线程函数中通过 std::this_thread::get_id() 获取线程 id。
1 cout << "Inside t2 thread: ID = " << std::this_thread::get_id () << endl;
终止子线程:
**t.join()**:创建线程执行线程函数,调用该函数会阻塞当前线程,直到线程执行完 join 才返回;等待t线程结束,当前线程继续往下运行
1 2 3 4 5 6 7 8 9 10 11 12 13 14 15 16 17 18 19 20 21 22 23 24 25 26 27 28 29 30 31 32 #include <iostream> #include <thread> using namespace std;void threadHadnle1 (int time) sleep_for (std::chrono::seconds (time));"hello thread1!" << endl;void threadHadnle2 (int time) sleep_for (std::chrono::seconds (time));"hello thread2!" << endl;int main () std::thread t1 (threadHadnle1, 2 ) ;std::thread t2 (threadHadnle1, 3 ) ;join ();join ();"main thread done" << endl;return 0 ;
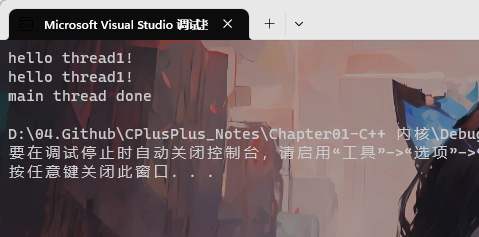
**t.detach()**:detach 调用之后,目标线程就成为了守护线程,驻留后台运行,与之关联的 std::thread 对象失去对目标线程的关联,无法再通过 std::thread 对象取得该线程的控制权,由操作系统负责回收资源;主线程结束,整个进程结束,所有子线程都自动结束了!
1 2 3 4 5 6 7 8 9 10 11 12 13 14 15 16 17 18 19 20 21 22 23 24 25 26 27 28 29 30 31 32 #include <iostream> #include <thread> using namespace std;void threadHadnle1 (int time) sleep_for (std::chrono::seconds (time));"hello thread1!" << endl;void threadHadnle2 (int time) sleep_for (std::chrono::seconds (time));"hello thread2!" << endl;int main () std::thread t1 (threadHadnle1, 2 ) ;std::thread t2 (threadHadnle1, 3 ) ;detach ();detach ();"main thread done" << endl;return 0 ;
线程如何结束:
线程函数返回(推荐)
调用 ExitThread 函数,线程自行撤销
同一进程或者另一个进程中调用 TerminateThread 函数
ExitProcess 和 TerminateProcess 函数可以终止线程进行
2. 线程间互斥 - mutex 互斥锁和 lock_guard 自动释放锁 Mutex 又称互斥量,C++ 11 中与 Mutex 相关的类(包括锁类型)和函数都声明在 <mutex> 头文件中,所以使用 std::mutex,就必须包含 <mutex> 头文件。
1. <mutex> 头文件介绍
Mutex 系列类(四种):
std::mutex:最基本的 Mutex 类std::recursive_mutex:递归 Mutex 类std::time_mutex:定时 Mutex 类std::recursive_timed_mutex:定时递归 Mutex 类
Lock 类(两种):
std::lock_guard:与 Mutex RAII 相关,方便线程对互斥量上锁。std::unique_lock:与 Mutex RAII 相关,方便线程对互斥量上锁,但是提供了更好的上锁和解锁控制。
其他类型:
std::once_flagstd::adopt_lock_tstd::defer_lock_tstd::try_to_lock_t
函数:
std::try_lock:尝试同时对多个互斥量上锁std::lock:可以同时对多个互斥量上锁std::call_once:如果多个线程需要同时调用某个函数,call_once 可以保证多个线程对该函数只调用一次。
2. std::mutex 介绍 下面以 std::mutex 为例介绍 C++ 11 中的互斥量用法。
std::mutex 是 C++ 11 中最基本的互斥量,std::mutex 对象提供了独占所有权的特性——即不支持递归地对 std::mutex 对象上锁,而 std::recursive_lock 则可以递归地对互斥量对象上锁。
std::mutex 成员函数:
构造函数 :std::mutex 不允许拷贝构造,也不允许 move 拷贝,最初产生的 mutex 对象是处于 unlocked 状态 的**lock()**:调用线程将锁住该互斥量。线程调用该函数会发生一下三种情况:
如果该互斥里昂当前没有被锁住,则调用线程将该互斥量舵主,知道调用了 unlock 志强,该线程一直拥有该锁。
如果当前互斥被其他线程锁住,则当前的调用线程被阻塞。
如果当前互斥量被当前调用线程锁住,则会产生死锁(deadlock )。
**unlock()**:解锁,释放互斥量的所有权。
**try_lock()**:尝试锁住互斥量,如果互斥量被其他线程占有,则当前线程也不会被阻塞。线程调用该函数也会出现下面三种情况:
如果当前互斥量没有被其他线程占有,则该线程锁住互斥量,直到该线程调用 unlock 释放互斥量。
如果当前互斥量被其他线程锁住,则当前调用线程返回 false,而并不会被阻塞掉。
如果当前互斥量被当前调用线程锁住,则会产生死锁(deadlock )。
为了保证 lock() 和 unlock() 对应使用,一般不直接使用 mutex,而是和 lock_guard、unique_lock 一起使用。
5. 示例 在多线程环境中运行的代码段,需要考虑是否存在竞态条件,如果存在竞态条件,就是说该代码段不是线程安全的,不能直接运行在多线程环境当中,对于这样的代码段,被称之为:临界区资源,对于临界区资源,多线程环境下需要保证它以原子操作执行,要保证临界区的原子操作,就需要用到线程间的互斥操作-锁机制,thread 类库还提供了更轻量级的基于 CAS 操作的原子操作类。
1 2 3 4 5 6 7 8 9 10 11 12 13 14 15 16 17 18 19 20 21 22 23 24 25 26 27 28 29 30 31 32 33 34 35 36 37 38 39 40 41 42 #include <iostream> #include <atomic> #include <thread> #include <list> int ticketCount = 1 ;void sumTask () int i = 1 ;for (i = 1 ; i <= 40 ; ++i)"窗口:" << index << "卖出第:" << ticketCount << " 张票!" << endl;sleep_for (std::chrono::milliseconds (10 ));int main () int i = 0 ;for (i = 1 ; i <= 3 ; i++)push_back (std::thread (sellTickets, i));for (std::thread& t : tlist)join ();return 0 ;
多线程同时对 ticketCount 进行操作,并不能保证同时只有一个线程对 ticketCount 执行 ++ 操作。最后的的结果不一定是100;
1 2 3 4 5 6 7 8 9 10 11 12 13 14 15 16 17 18 19 20 21 22 23 24 25 26 27 28 29 30 31 32 33 34 35 36 37 38 39 40 41 42 43 44 45 46 47 #include <iostream> #include <mutex> #include <atomic> #include <list> using namespace std;int ticketCount = 1 ;void sellTickets (int index) int i = 0 ;for (i = 1 ; i <= 40 ; i++)lock_guard<std::mutex> lock (mtx) ;"窗口:" << index << "卖出第:" << ticketCount << " 张票!" << endl;sleep_for (std::chrono::milliseconds (100 ));int main () int i = 0 ;for (i = 1 ; i <= 3 ; i++)push_back (std::thread (sellTickets, i));for (std::thread& t : tlist)join ();return 0 ;
对 count++ 操作上锁,保证一次只有一个线程能对其操作,结果是 120。
3. 线程间同步通信 - 生产者消费者模型 多线程在运行过程中,各个线程都是随着 OS 的调度算法,占用 CPU 时间片来执行指令做事情,每个线程的运行完全没有顺序可言。但是在某些应用场景下,一个线程需要等待另外一个线程的运行结果,才能继续往下执行,这就需要涉及线程之间的同步通信机制。
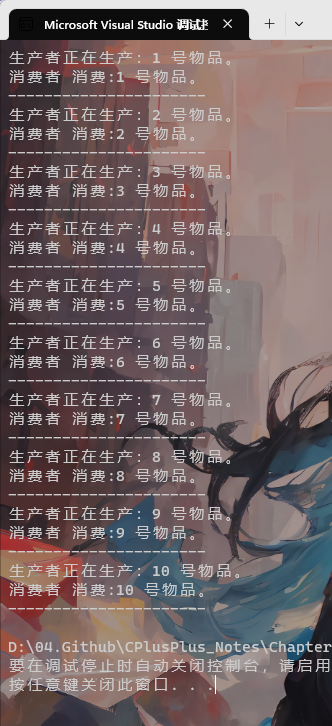
线程间同步通信最典型的例子就是生产者-消费者模型 ,生产者线程生产出产品以后,会通知消费者线程去消费产品;如果消费者线程去消费产品,发现还没有产品生产出来,它需要通知生产者线程赶快生产产品,等生产者线程生产出产品以后,消费者线程才能继续往下执行。
C++ 11 线程库提供的条件变量 condition_variable,就是 Linux 平台下的 Condition Variable 机制,用于解决线程间的同步通信问题,下面通过代码演示一个生产者-消费者线程模型:
1 2 3 4 5 6 7 8 9 10 11 12 13 14 15 16 17 18 19 20 21 22 23 24 25 26 27 28 29 30 31 32 33 34 35 36 37 38 39 40 41 42 43 44 45 46 47 48 49 50 51 52 53 54 55 56 57 58 59 60 61 62 63 64 65 66 67 68 69 70 71 72 73 74 75 76 77 78 79 80 81 82 83 84 85 86 87 88 89 90 91 92 93 94 95 96 97 98 99 100 #include <iostream> #include <thread> #include <mutex> #include <condition_variable> #include <queue> using namespace std;class Queue public :void put (int val) {unique_lock<std::mutex> lck (mtx) ;while (!que.empty ())wait (lck);push (val);notify_all ();"生产者正在生产:" << val << " 号物品。" << endl;int get () {unique_lock<std::mutex> lck (mtx) ;while (que.empty ())wait (lck);int val = que.front ();pop ();notify_all ();"消费者 消费:" << val << " 号物品。" << endl;"----------------------" << endl;return val;private :int > que;void producer (Queue* que) for (int i = 1 ; i <= 10 ; ++i)put (i);sleep_for (std::chrono::milliseconds (100 ));void consumer (Queue* que) for (int i = 1 ; i <= 10 ; ++i)get ();sleep_for (std::chrono::milliseconds (100 ));int main () std::thread t1 (producer, &que) ;std::thread t2 (consumer, &que) ;join ();join ();return 0 ;
4. 再谈 lock_guard 和 unique_lock 这两个其实可以类比智能指针来记:lock_gurad 类比于 scoped_ptr,它的拷贝构造和复制构造都被删除了,不可用在函数参数传递或者返回过程中 ,只能用在简单的临界区代码段的互斥操作中。
1
2
lock_ guard (const lock_ guard&) =delete ;operator = (const lock_ guard&)=delete ;
而 unique_lock 可以类比于 unique_ptr,它不仅可以用在简单的临界代码段的互斥操作中,还能用在函数调用过程中。
总的来说,建议使用unique_lock.
1. std::lock_gurad std::lock_guard 是 RAII 模板类 的简单实现,功能简单。
std::lock_guard 在构造函数中进行加锁,析构函数中进行解锁。
1 2 3 4 5 6 7 8 9 10 11 12 13 14 15 16 17 18 19 20 21 22 23 24 25 26 27 28 29 30 31 32 33 template <class _Mutex >class lock_guard public :using mutex_type = _Mutex;explicit lock_guard (_Mutex& _Mtx) : _MyMutex(_Mtx) { lock ();lock_guard (_Mutex& _Mtx, adopt_lock_t )lock_guard () noexcept unlock ();lock_guard (const lock_guard&) = delete ;operator =(const lock_guard&) = delete ;private :
lock_gurad 源码中看出,它在构造时进行上锁,在出作用域执行析构函数时释放锁;同时不允许拷贝构造和赋值运算符操作;
比较简单,不能用在函数参数传递或者返回过程中,因为它的拷贝构造和赋值运算符被禁用了;只能用在简单的临界区代码的互斥操作。
2. std::unique_lock 类 unique_lock 是通用互斥包装器,允许延迟锁定、锁定的有时限尝试、递归锁定、所有权转移和与条件变量一同使用 。
unique_lock 比 lock_guard 使用更加灵活,功能更加强大。使用 unique_lock 需要付出更多的时间、性能成本。
1
2
3
4
5
6
7
8
9
10
11
12
13
14
15
16
17
18
19
20
21
22
23
24
25
26
27
28
29
30
31
32
33
34
35
36
37
38
39
40
41
42
43
44
45
46
47
48
49
50
51
52
53
54
55
56
57
58
59
60
61
62
63
64
65
66
67
68
69
70
71
72
73
74
75
76
77
78
79
80
81
82
83
84
85
86
87
88
89
90
91
92
93
94
95
96
97
98
99
100
101
102
103
104
105
106
107
108
109
110
111
112
113
114
115
116
117
118
119
120
121
122
123
124
125
126
127
128
129
130
131
132
133
134
135
136
137
138
139
140
141
142
143
144
145
146
147
148
149
150
151
152
153
154
155
156
157
158
159
160
161
162
163
164
165
166
167
168
169
170
171
172
173
174
175
176
177
178
179
180
181
182
183
184
185
186
187
188
189
190
191
192
193
194
195
196
197
198
199
200
201
202
203
204
205
206
207
208
template <class _Mutex >class unique_lock public :typedef _Mutex mutex_type;unique_lock () noexcept nullptr ), _Owns(false )explicit unique_lock (_Mutex& _Mtx) : _Pmtx(_STD addressof(_Mtx)) , _Owns(false) { lock ();true ;unique_lock (_Mutex& _Mtx, adopt_lock_t )addressof (_Mtx))true )unique_lock (_Mutex& _Mtx, defer_lock_t ) noexcept addressof (_Mtx))false )unique_lock (_Mutex& _Mtx, try_to_lock_t )addressof (_Mtx))try_lock ())template <class _Rep, class _Period> unique_lock (_Mutex& _Mtx, const chrono::duration<_Rep, _Period>& _Rel_time) : _Pmtx(_STD addressof(_Mtx)) , _Owns(_Pmtx->try_lock_for(_Rel_time)) { template <class _Clock, class _Duration> unique_lock (_Mutex& _Mtx, const chrono::time_point<_Clock, _Duration>& _Abs_time) : _Pmtx(_STD addressof(_Mtx)) , _Owns(_Pmtx->try_lock_until(_Abs_time)) { unique_lock (_Mutex& _Mtx, const xtime *_Abs_time)addressof (_Mtx)), _Owns(false )try_lock_until (_Abs_time);unique_lock (unique_lock&& _Other) noexcept nullptr ;false ;operator =(unique_lock&& _Other)if (this != _STD addressof (_Other))if (_Owns)unlock ();nullptr ;false ;return (*this );unique_lock () noexcept if (_Owns)unlock ();unique_lock (const unique_lock&) = delete ;operator =(const unique_lock&) = delete ;void lock () { lock ();true ;_NODISCARD bool try_lock () { try_lock ();return (_Owns);template <class _Rep, class _Period> _NODISCARD bool try_lock_for (const chrono::duration<_Rep, _Period>& _Rel_time) {try_lock_for (_Rel_time);return (_Owns);template <class _Clock, class _Duration> _NODISCARD bool try_lock_until (const chrono::time_point<_Clock, _Duration>& _Abs_time) { try_lock_until (_Abs_time);return (_Owns);_NODISCARD bool try_lock_until (const xtime *_Abs_time) { try_lock_until (_Abs_time);return (_Owns);void unlock () { if (!_Pmtx || !_Owns)system_error (make_error_code (errc::operation_not_permitted)));unlock ();false ;void swap (unique_lock& _Other) noexcept { _STD swap (_Pmtx, _Other._Pmtx) ;_STD swap (_Owns, _Other._Owns) ;_Mutex *release () noexcept { nullptr ;false ;return (_Res);_NODISCARD bool owns_lock () const noexcept { return (_Owns);explicit operator bool () const noexcept { return (_Owns);_NODISCARD _Mutex *mutex () const noexcept { return (_Pmtx);private :bool _Owns;void _Validate() const if (!_Pmtx)system_error (make_error_code (errc::operation_not_permitted)));if (_Owns)system_error (make_error_code (errc::resource_deadlock_would_occur)));
其中,有 _Mutec* _Pmtx; 只想一把锁的指针;不允许使用左值拷贝构造和赋值,但是可以使用右值拷贝构造和赋值,可以在函数调用过程中使用。
因此可以和条件变量一起使用:cv.wait(lock); 可以作为函数参数传入;
5. 基于 CAS 操作的 atomic 原子类型 因为锁的操作是比较重,对于系统消耗有些大,而且在临界区代码做的事情比较复杂,比较多。所以引入了 CAS 来保证上面的 --操作 的原子特性 。同时这也是无锁操作。
C++ 11 的 thread 类库提供了针对简单类型的原子操作类,如: std::atomic_int,atomic_long,atomic_bool 等,它们值的增减都是基于 CAS 操作的,既保证了线程安全,效率还非常高。
互斥锁用于比较复杂的场景,而简单的 ++,– 使用轻量的 atomic 原子类型即可。
1 2 3 4 5 6 7 8 9 10 11 12 13 14 15 16 17 18 19 20 21 22 23 24 25 26 27 28 29 30 31 32 33 34 35 36 37 38 39 40 41 #include <iostream> #include <atomic> #include <thread> #include <list> volatile std::atomic_bool isReady = false ;volatile std::atomic_int mycount = 0 ;void task () while (!isReady)yield (); for (int i = 0 ; i < 100 ; ++i)int main () for (int i = 0 ; i < 10 ; ++i)push_back (std::thread (task));sleep_for (std::chrono::seconds (3 ));true ;for (std::thread &t : tlist)join ();"mycount:" << mycount << endl;return 0 ;
番外介绍:线程死锁 概述死锁:
线程死锁是指两个或两个以上的线程互相持有对方所需要的资源,由于 synchronized 特性,一个线程池有一个资源,或者说获得一个锁,在该线程释放这个锁之前,其他线程是获取不到这个锁的,而且会一直死等下去,因此便造成了死锁。
死锁产生的条件:
互斥条件 :一个资源或者说一个锁只能被一个线程所占有,当一个线程首先获取到这个锁之后,在该线程释放这个锁之前,其他线程均无法获取到这个锁。占有且等待 :一个线程已经获取到一个锁,再获取另一个锁的过程中,即使获取不到也不会释放已经获得的锁。不可剥夺条件 :任何一个线程都无法强制获取别的线程已经占有的锁。循环等待条件 :线程A拿着线程B的锁,线程B拿着线程A的锁。
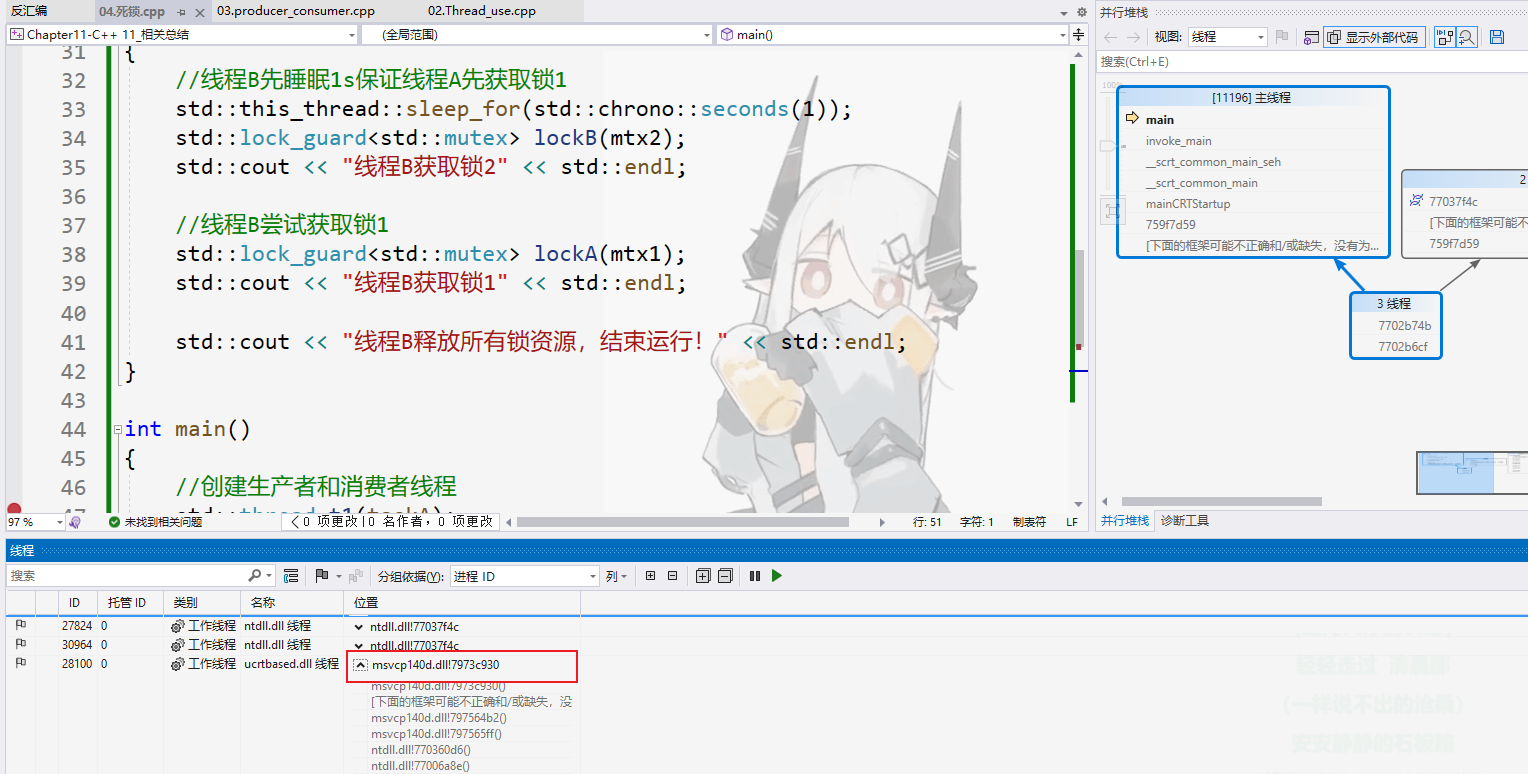
1. 示例 当一个程序的多个线程获取多个互斥锁资源的时候,就有可能发生死锁问题,比如线程 A 先获取了锁 1,线程 B 获取了锁 2,进而线程 A 还需要获取锁 2 才能继续执行,但是由于锁 2 被线程 B 持有还没有释放,线程 A 为了等待锁 2 资源就阻塞了;线程 B 这时候需要获取锁 1 才能往下执行,但是由于锁 1 被线程 A 持有,导致 A 也进入阻塞。
线程 A 和线程 B 都在等待对方释放锁资源,但是它们又不肯释放原来的锁资源,导致线程 A 和 B 一直互相等待,进程死锁了。下面代码示例演示这个问题:
1 2 3 4 5 6 7 8 9 10 11 12 13 14 15 16 17 18 19 20 21 22 23 24 25 26 27 28 29 30 31 32 33 34 35 36 37 38 39 40 41 42 43 44 45 46 47 48 49 50 51 52 53 54 55 #include <iostream> #include <thread> #include <mutex> #include <condition_variable> #include <vector> void taskA () std::lock_guard<std::mutex> lockA (mtx1) ;"线程A获取锁1" << std::endl;sleep_for (std::chrono::seconds (2 ));std::lock_guard<std::mutex> lockB (mtx2) ;"线程A获取锁2" << std::endl;"线程A释放所有锁资源,结束运行!" << std::endl;void taskB () sleep_for (std::chrono::seconds (1 ));std::lock_guard<std::mutex> lockB (mtx2) ;"线程B获取锁2" << std::endl;std::lock_guard<std::mutex> lockA (mtx1) ;"线程B获取锁1" << std::endl;"线程B释放所有锁资源,结束运行!" << std::endl;int main () std::thread t1 (taskA) ;std::thread t2 (taskB) ;join ();join ();return 0 ;
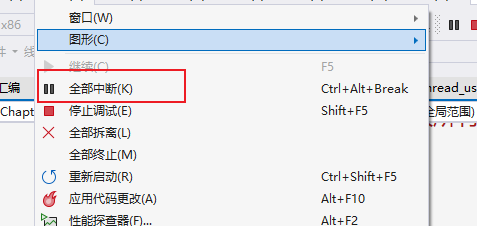
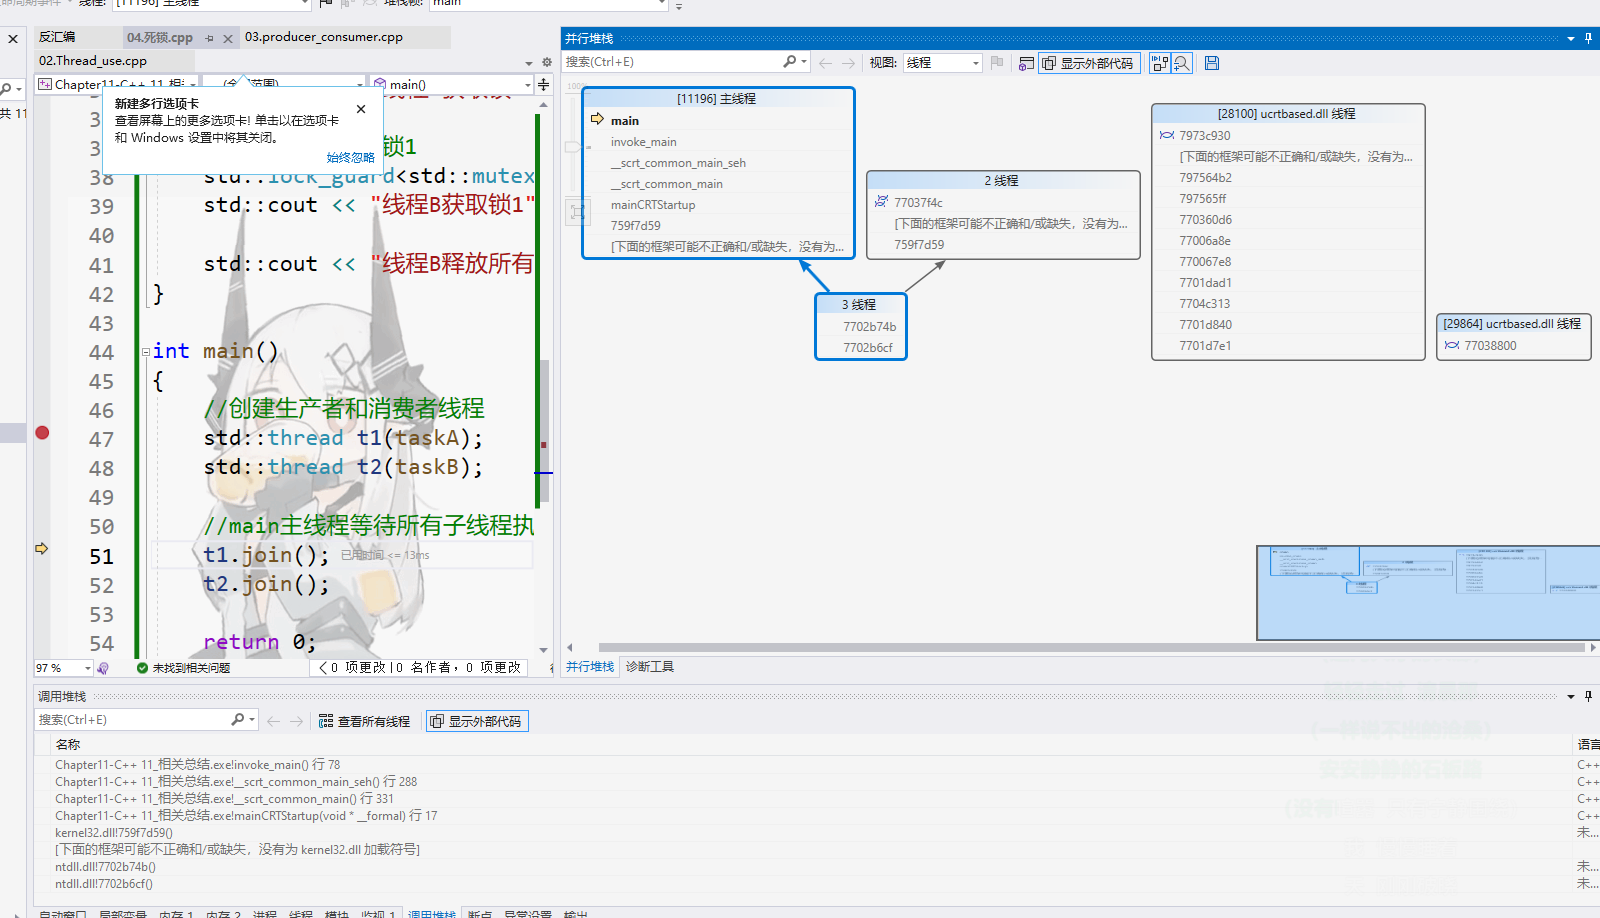
可以看到,线程 A 获取锁 1、线程 B 获取锁 2 以后,进程就不往下继续执行了,一直等待在这里,如果这就碰到的一个问题场景,如何判断出这是由于线程间死锁引起的呢?
打开 process Explorer。找到该进程,查看线程状态,发现线程的 cpu 利用率为 0,那么应该不是死循环,应该是死锁了:
断:查看每一个线程的函数执行的位置
发现当前线程正在申请锁的位置,判断出应该是锁了。
同时主线程走了等待子线程结束。